Apethorpe Hall's Jacobean Ceilings
Philip Gaches
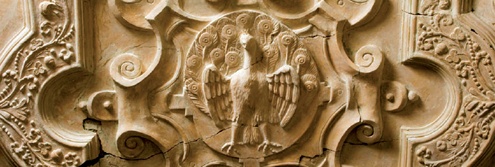 |
| Detail of a peacock from the Dining Room |
Apethorpe Hall in Northamptonshire has six surviving ceilings dating from the 1620s. The plasterer who carried out the work was probably Edward Stanyon, although there is no surviving documentation to confirm this.
The house was altered in the 1740s when a suite of rooms was added over the state apartments. Some of the problems with the ceilings can be attributed to the 1740 alterations, while others are due to poor maintenance.
Work on the conservation and repair of the six Jacobean ceilings in the state apartments, and on one ceiling from 1740, began in spring 2006.
Rib design
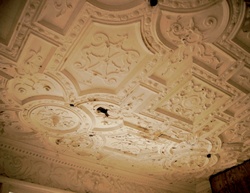
During the ceiling conservation repairs a number of horizontal and vertical lines became apparent. The lines stood out in white against the yellow background of the plaster, as they were scratched into the plaster surface and had become filled with limewash from earlier decorative schemes. It could be seen that some lines corresponded with the edge of parts of the geometric strapwork, while others passed through the centre of other decorative elements, suggesting that the ceilings were first sketched on paper and then transferred to the ceiling using a grid system. The same scratched lines could be seen on the 1740s work in the Great Chamber. In addition, some of the curved elements were found to be so precisely circular that some form of centring must have been used. In the Great Chamber the main enriched ribs overlay some fine strapwork circles which are too precise to have been formed freehand without some marking out. The centre of the circle would have to have been in the adjacent rib.
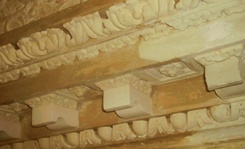
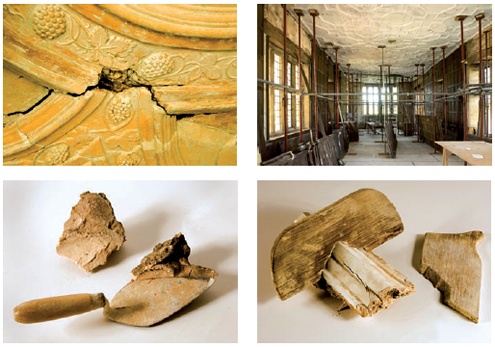 |
| Top left: detail of damaged plasterwork from the Duke’s Room - the circular motifs had been set out using centred lines scribed into the plasterwork above, but as the wobbly lines clearly show, no guides or rules were used when the ribs were formed. Top right: The Long Gallery with its simple ornamentation of plain ribs. Bottom left: marks found on the plaster indicate the use of a blade similar to the small metal trowel used today. Bottom right: for the restoration of damaged sections of ribs, moulds were made from oak to match the original profile. The hand-held thumb mould which was used to achieve the final polished finish is shown on the right. |
Long Gallery
The plasterwork in the long gallery was applied in three coats. The first, or 'pricking-up’, coat is typical: it has a covering of approximately 10-15mm over the laths and with the keys formed through the lath gaps in the normal way. The laths are riven oak of varying widths (20-35mm) and thicknesses (4-8mm). The gaps vary in width from 1-20mm. Evidence found at Apethorpe suggests that the pricking-up coat was applied using a small trowel. The localised unevenness would also suggest that a small-bladed trowel was used, since a larger trowel with a straight blade typically applies the plaster straighter and more evenly.
The second coat was applied approximately 10-15mm thick and trowelled semi-smooth. While still green, the position of the ribs was marked by scratching into the second coat of plaster. It is probable that a thin coat of plaster was applied on to the scratched pattern soon afterwards to begin building up the ribs. This coat was applied very roughly at a thickness of 10-20mm. The final coat was applied to the ribs and worked over with a hand-held thumb mould. The ribs were found to be too uneven and misshapen to have been formed using any rules, but some form of octagonal former may have been used to maintain a general level of precision.
Once the ribs were complete, the finish coat was applied to the flat ceiling between the ribs. No thin/fine coat was found in the original work, which leads us to think that the surface of the ribs was worked to a smooth finish by polishing with a thumb mould. The mould used for our repairs was made of 8mm-thick oak (see illustration on page 213). The profile was angled so that it could be used to bring the latence (the small particles) to the surface and polish it.
Dining Room, Duke's Room and Drawing Room
The work in the Dining Room is more elaborate and therefore a different technique was used in its creation. The method of lathing, pricking and floating coats is the same as that used in the Long Gallery. The enriched ribs were formed by firstly running a square plain band as a core for the rib, then the perimeter mouldings were run in situ with a small thumb mould using the plain band as a guide. Once the perimeter mouldings were complete, the enrichment was formed by filling an oak reverse mould with mortar, pushing this into place while the mortar was still soft, leaving it for a few moments to allow the suction to grip the mortar, and then removing the mould leaving the enrichment in place. The gaps between the enrichment and the perimeter mouldings could then be filled by hand and finished with a small metal tool. Evidence of this process is visible in the surface texture. Since the pattern varies, several different moulds, some curved and some straight, must have been used to create the enrichments.
Some means of centring must have been used, as a second layer of pattern, which appears as if formed below the main ribs, has some very precise circular motifs – too precise to have been formed freehand. It is also likely that the ceiling ribs were created using formwork, as they are quite precise throughout. However, they are not so precise as to suggest the use of running rules, such as those used to form in situ mouldings in a Georgian house. In the Long Gallery, for example, making three or four simple timber octagons would have been an obvious way of making the process quicker and easier. With the octagon formers fixed on a series of chalk lines, the size and position of each octagon could easily be formed using a hand-held mould pushed through the plaster while braced against the outer edge of the timber octagon. The heraldic emblems were hand modelled in situ.
The Duke’s Room and the Drawing Room are decorated in much the same manner, although the Duke’s Room contains less enrichment.
 |
|
| Plasterwork in the Dining Room, the most elaborate of the Jacobean ceilings at Apethorpe | |
 |
 |
 |
|
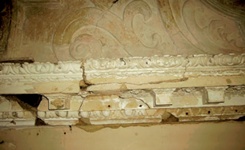
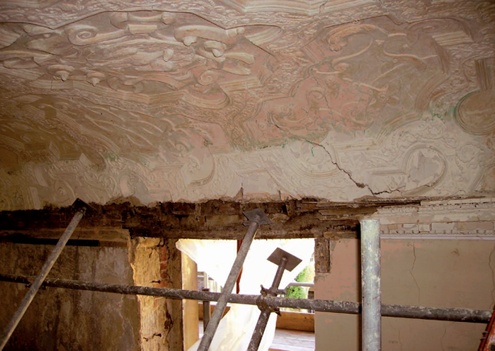
| Damage to the cornice in the Dining Room necessitated structural stabilisation and the reinstatement of missing components. | |
The King's Room
The design of the strapwork here is very simple in comparison to the Long Gallery or Dining Room. The strapwork is flat and square and varies in width by 10-15mm, suggesting that it was formed freehand. Small rosettes were cast and pressed into the strapwork while it was still wet. No sign of an adhesive layer could be seen, suggesting wet mortar was pushed onto wet mortar. During repairs a mould was made of one of the rosettes using plaster of Paris. This was then filled with the repair mortar and immediately pressed into some soft strapwork. The result was a rosette which became part of the strapwork, rather than one that had been stuck to it.
 |
 |
||
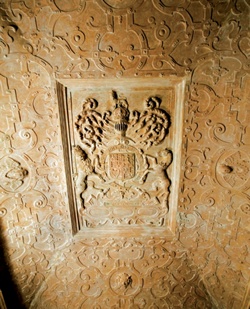
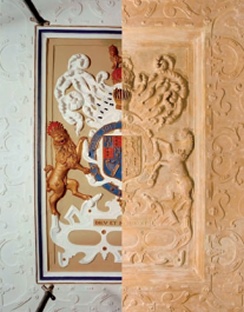
| The King’s Room ceiling and (right) a detail of its heraldic central panel before and after paint removal | |||
THE RESTORATION WORK
The Duke's Room
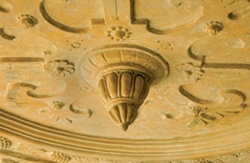
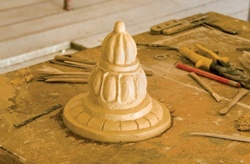
The central pendant was missing here and a new one was made using the repair mortar. It was modelled in a single coat and the basic shape was hand-formed. This was then left for two days to stiffen, at which point the decoration was modelled onto it. The whole process took no more than one hour in actual working time and no cracking occurred in the mortar, which was up to 125mm thick.
Materials
An analysis of the plaster from the ceilings of
the state rooms was carried out by Sandberg
LLP materials consultancy. The results showed
a high proportion of calcium carbonate, on the
basis of which a calculated volume proportion
of up to 23 parts lime binder to one part
aggregate was initially suggested. The analysis
also showed some hydraulic action, suggesting
that an impure, non-hydraulic lime had been
used. The aggregate used for the repairs was
limestone (which is locally abundant) and
this may have been responsible for the high
proportion of lime identified in the analysis
results.
 |
|
 |
|
 |
|
| The Duke’s Room ceiling (top) and the replacement for the missing central pendant |
In late summer 2006 a series of mortar samples was produced ranging from 20 parts chalk lime putty to one part Clipsham limestone aggregate, down to five parts putty to one part stone aggregate, all with hair added. The richness of the mixes made them unstable and prone to shrinkage and cracking. The original mortars were laid on up to 20mm thick, in one coat. When used at this thickness, our mortar samples cracked and appeared too white and dry. A further series of samples was then produced with ratios of four parts chalk lime putty to one part Clipsham limestone aggregate, down to one part putty to one part stone, all with hair added. These mortars were more stable at the required thickness and the 1:1 mix took on the same colour characteristics as the original mortars.
The next stage was to produce a one metre square panel on riven laths, including the rib design from the Long Gallery. This stage was intended to enable us to ensure that we had created a sufficiently stable and workable mortar to replicate the Jacobean plasterwork. When applied to the laths, extensive cracking appeared and the edges of the plaster delaminated owing to the degree of shrinkage. The ribs were formed but, again, the high levels of shrinkage were a problem and required the use of a final wash coat to fill in the cracks. This cracking is seen on some of the 1740 remodelling but not in the 1620s work. It was therefore evident that our mortar was still not behaving in the same way as the original.
It was then agreed that a new mortar should be trialled using a feebly hydraulic lime. This was made up of one part Singleton Birch NHL2 (soaked to a paste for a minimum of 24 hours prior to use) with one part Clipsham stone dust, with a particle size of up to five millimetres. Goat hair was added at a ratio of 1kg to every 25 litres of lime putty. A small inclusion of fine sand was added for appearance (2.5 litres to every 25 litres of stone aggregate). The Singleton Birch NHL 2 was found to remain in a soft putty form for over a month after soaking and, when mixed into a mortar, was still workable two weeks after mixing.
The feebly hydraulic mortar could be used at the 20mm thickness required with only slight cracking, and could be later consolidated to produce a fine finish. The mortar was mixed in a roller pan which ground the stone aggregate down to a fineness approaching that of the original mortar. While the original mortar contained some 2mm particles, the majority of the aggregate was composed of particles of between 0.5mm and 1mm. This fineness enabled us to replicate the polished surface of the 1620s work. Being made up of fine irregular stone particles and a high proportion of lime, the mortar became very sticky and plastic.
By carefully observing the evidence left by the original craftsmen and by trying – and, indeed, sometimes failing – to replicate their methods and materials, we have learnt and achieved much. The plasterwork ceilings at Apethorpe Hall represent some of the finest and best preserved examples of Jacobean plasterers’ skills. Thanks to the determination of English Heritage, Rodney Melville Architects, and the skilled tradesmen and women employed during the recent conservation and repairs programme, they can at last be seen and enjoyed by the nation.