Basic HTML Version


34
BCD Special Report on
Historic Churches
18th annual edition
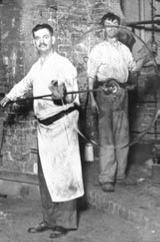
blown into a large bubble, then manipulated
into the form of a wide-bottomed decanter.
A solid iron rod or ‘punty’ was then attached
to it at a point opposite the blowing iron by
dipping the punty into molten glass and fusing
it to the gather. The blowing iron was then
detached and the end of the bubble opened
out to form an aperture. This opening was then
presented to the fierce heat of the furnace until
almost molten, then spun rapidly, unfurling
into the familiar disc or crown of brilliant
glass (above left). These varied greatly in size:
medieval coloured bullions were small, only
a foot or so across, but at the height of crown
glass production in the 18th century huge
crowns were blown, often six feet across.
These became very thin at the outer edge,
often less than 1mm thick and possessing great
clarity and brilliance in these thinner areas.
As crown glass is no longer made, cylinder
glass is the only suitable replacement, but
it must be carefully selected for thickness
and tint. Specialist glaziers buy up stocks of
very thin cylinder glass when available and
will commission specific batches for projects
to ensure the best match for crown glass.
An example is the important stable block at
Stoneleigh Abbey, Warwickshire, for which
Verriers St Just blew very thin cylinders of
a particular shade of blue to special order
for Holy Well Glass, ensuring an excellent
match with surviving quarry glazing.
For sash window glazing, where the
distinct curvature of the crown is much
more visible than in the smaller pieces in
leaded light glazing, it will be necessary to
curve the glass under heat on a kiln former
to achieve the correct appearance. The
London Crown Glass Company can provide
carefully selected heat-formed curved cylinder
glass where larger amounts are required.
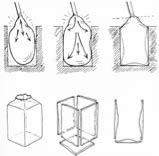
Slab glass
The final sort of glass commonly encountered
is Norman slab glass, which was blown into
rectangular moulds as a bottle before being cut
into small panes when cold. The thickness of
the glass, ranging from very thick at the centre
of the pane, to very thin at the edges, transmits
light in a particularly rich fashion. The use of
spectacularly coloured slabs in work of the Arts
and Crafts period is well known, but this glass
was also used to great effect in plain glazing.
For repairs, carefully selected cylinder
glass, sometimes ‘plated’ (fixing two or
more layers of glass together) to achieve the
necessary depth, can approximate slab glass.
However, there is no substitute for approaching
a conservator who holds old stocks. It is
also possible to commission new slab glass.
English Antique Glass will produce slab glass
to match the original if sufficient is ordered.
REPAIR METHODS
Resin edge bonds
While the method selected should be carefully
considered to suit the situation, in broad terms
edge bonding with epoxy resin is not generally
suitable for the repair of plain glazing. This is
because resin edge bonding is far more fragile
than other available methods of repair. It was
developed for museum use and while often
employed in the conservation of important
stained and painted glass, the bonds are
usually protected by protective glazing in some
form. Without such protection window glass
is exposed to the elements and tends to be
worked hard. Casement panels may be opened
frequently, but even fixed lights are subject to
wear and tear and local damage is common.
However, in certain situations, such as the
repair of crown glass in sash windows where
applied repair methods may be unsightly, or
where a particularly beautiful section of glass
has multiple cracks but remains intact, in
situ resin bonds may be a sensible choice.
In situ resin bonds can also be employed
in such situations as a useful temporary
repair, conserving shattered fragments
The disc of glass or ‘crown’ from which crown glass
takes its name
The method of slab glass production (Diagrams
reproduced by kind permission of Peter Cormack FSA)
The brilliance of slab glass
in situ pending future conservation.
The crack is cleaned and degreased
by irrigating with acetone on a cotton bud
and the resin is introduced with a scalpel
tip. The resin pulls along the crack under
capillary action, which can be monitored
with an eyeglass to ensure a full flow.
To ensure that the resin cures properly it
should be measured accurately by weight on
a digital balance. The preferable epoxy resin
for this purpose is Araldite 20:20, which is
a more predictable material over a slightly
wider temperature range for in situ repair
than some other resins such as HXTAL
NYL-1. In situ resin works should not be
carried out in cold conditions or towards the
end of the working day as wide temperature
fluctuations are more likely overnight.
In studio-based conservation, resin residues
are cleaned thoroughly and all repairs marked
clearly on conservation diagrams. For in situ
bonds, however, there is an argument for leaving
the tiny bead of resin at the point of application
to serve as an indicator for future artisans
that the resin bond has been carried out.