
Brilliant Glass
Brilliant Cut and Acid Etched Glass Decoration
Rodney Bender
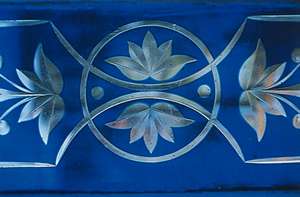
 |
|
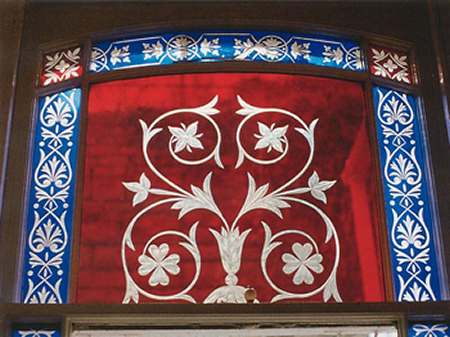
| A domestic star light with brilliant cut flashed glass |
The abolition of the glass tax in 1845 and the window tax six years later led to an unprecedented reduction in the price of glass. Cast plate glass, manufactured in England since 1773, had been prohibitively expensive for all but the most extravagant of projects. Now, with the abolition of these Draconian taxes, its use became widespread in the windows of shops and public buildings. The size and thickness of plate glass compared to that of crown or cylinder sheet glass meant that it could be used to glaze larger openings and it offered new possibilities for decoration. Larger window openings meant increased light and visibility. For a nation of shopkeepers this was no bad thing. However, increased visibility was not desirable in all establishments; certainly not the public house. It was here that two techniques, brilliant cutting and acid etching, came to flourish.
Plate glass, because of its thickness and weight, provided the ideal surface for these decorative techniques. They in turn created privacy and enhanced illumination. Furthermore, these techniques offered the opportunity for introducing glittering and unrestrained decoration. With the exception of bottles and glasses there could have been no better addition to the drunken rococo decoration of the Victorian public house.
Glitter is important because it helps to single out the public house from all the neighbouring buildings, and because it helps to produce that cinematic sense of exciting unreality which a public house, to be successful, must provide. (John Piper, 'Fully Licenced', Architectural Review, 1940)
 |
|
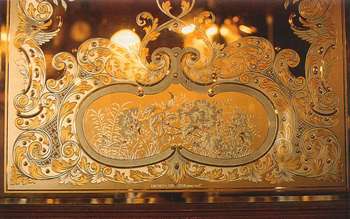
| Detail of a public house mirror with brilliant cut, triple etched, gilded and silvered decoration |
The trades of brilliant cutting and acid etching had developed independently but when they frequented the public house they joined forces and, together with other decorative glass techniques such as bevelling, silvering and gilding, produced some of the most elaborate effects in the history of decorative glass (illustrated left). Cartouches, swags and arabesques in unrestrained and intemperate excess decorated the glass surface. This battery of techniques, principally based around frosted acid etching and brilliant cutting, were sometimes referred to as French embossing because of the similarity in design with the French decorative style, the rococo. Many of the designs are clearly adapted from this source.
The domestic interior also became a showcase for brilliant cutting and acid etching (see the following two illustrations). Here the results were far more temperate than the public house. Designs usually reflected the prevailing classical taste. Door and window panels of brilliant cut and acid etched glass were frequently used in Victorian and Edwardian interiors to obscure unsightly views and to increase privacy without sacrificing daylight. Acid frosted glass had the virtue of eliminating transparency whilst heightening the sense of illumination due to the way it scattered light. Brilliant cutting reduced transparency but its faceted surface captured light and created surface sparkle. Combined, these two techniques transformed a plain and lifeless surface into one that was gay and lively.
 |
|
| Detail of white acid triple embossing |
From the 1860s acid etching and brilliant cutting were widely employed for commercial promotion. Shop fascias, advertising boards and even tradesmen's vans were fitted with decorated plate glass signs. So widespread was the use of glass that the sign writer soon found the craft of acid etching an indispensable addition to his trade.
THE ACID ETCHING PROCESS
Acid etching or 'embossing' as it is sometimes called in the trade, involves principally the use of hydrofluoric acid, one of the few acids which will rapidly corrode glass. This acid, made by heating fluor spar (calcium fluoride) with sulphuric acid and condensing the resultant gas in water, was first chemically identified by a Swedish chemist in 1771, although it was certainly used several hundred years prior to this date. Stained glass workers used a substance called 'strong water' to remove the surface of flashed glass (a sheet glass that has a thin layer of colour on one side). During the 19th century the process of acid etching developed into a craft in its own right.
When acid etching was first developed, only the fumes of hydrofluoric acid were used. An acid-resistant paint, usually Brunswick black, was painted on the surface of plate glass in a decorative design. The glass was then exposed to the highly toxic fumes which rapidly frosted the unprotected areas. Finally the acid resist was removed to reveal the clear pattern on a frosted background.
The use of fumes to frost the glass was soon superseded by clear etching. In this technique the glass was painted in the same way but a wall of tallow (a form of animal fat) was placed around the edge of the glass like the rim of a tray. The surface could then be flooded with liquid acid. After about one hour, the acid was poured off, leaving the surface etched to a depth of about 0.5mm. Although clear, this finish was not as transparent as the original, and the glass was described as clear etched or 'embossed'. It was often silvered or gilded.
Clear etched glass was sometimes subjected to a further treatment known as 'emboss and ground'. Here the glass was ground by sprinkling emery powder and water on to the surface and rubbing it with a smaller sheet of plate glass. As a result, the raised areas of the sheet were ground and made obscure whereas the etched areas being lower were untouched by the abrasion and remained clear. This technique was widely used especially by sign writers who also gilded the etched areas.
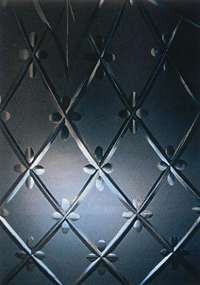
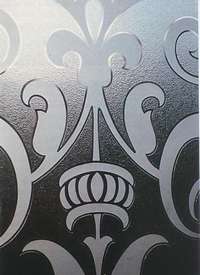 |
|
| Detail of stipple embossed panel with white acid frosting |
Numerous other clear etching processes were employed to texture plate glass, the most common being 'stipple embossing'. In this process the etched surface was sprinkled with mica flakes during etching, creating a glistening stippled effect on the surface of the glass, like rain drops on a window pane (right). Decorative acid etching techniques were also used on flashed glass to good effect.
In the early part of the 19th century, glass workers made their own hydrofluoric acid, but the pernicious nature of the process did not make the practice desirable. Soon it was possible to buy acid in gutta percha containers from manufacturing chemists. However, the process of etching remained a risky undertaking; hydrofluoric acid is an extremely dangerous chemical and there were no air-extraction systems to remove noxious fumes.
The fumes escape from full strength acid so profusely as to be quite visible like a yellow smoke, and are not only obnoxious, but dangerous. Even at moderate working strength they will cause bleeding of the throat and nostrils in persons in whom these organs happen to be weak, while they commonly cause severe smarting of the eyes, which is only relieved by a flow of tears. On the other hand they are said to have a beneficial effect in cases of pulmonary consumption - a disease which is practically non-existent among people who handle this acid. (Arthur Louis Duthie, Decorative Glass Processes, 1908)
One other etching agent was developed and exploited to the full during the 19th century. Known as 'white acid', it was made by mixing hydrofluoric acid with an alkali, usually carbonate of soda (washing soda). This produced a 'frosting acid' that imparted a dense white frost to the surface of glass. Subsequent etchings with dilute hydrofluoric acid produced a range of satin tones. This process is known in the trade as 'French embossing' or 'triple embossing' and was frequently employed in combination with brilliant cutting.
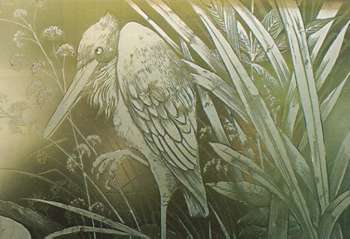
Sophisticated images that resembled wood block engravings could be produced using white acid in combination with embossing acid (such as the heron, illustrated above).
THE BRILLIANT CUTTING PROCESS
 |
|
| Detail of brilliant cuts made with a mitre wheel and a round wheel |
Brilliant cutting, the process of wheel engraving sheets of plate glass, was first introduced to this country during the 1850s by Mark Bowden of Bristol. There was nothing inherently new about the technique; the process of engraving hollow-ware glass and mirrors was an old established craft. Its application on flat glass however, was confined to a comparatively small scale. The proliferation of cast glass in the 19th century provided the opportunity to apply this craft on an architectural scale.
Brilliant
cutters used engraving wheels made from carboniferous sandstone that varied
in diameter from 5 to 90cm. Each stone created a particular effect. Generally
the large stones were used for straight lines and gentle curves and the
smaller stones for tighter curves. The profile of the cutting edge was
either round, square or mitred.
| Round profiled wheels produced a concave effect and were often used to produce a circular or elliptical concavity in the glass known as a punt. | |
| Round wheel and round punt (section and plan) | |
|
|
Square
profiled wheels were used mostly for line work and for making
leaf forms. Only one side of the wheel was used, which resulted
in a groove that was deep on one side and gradually sloping off to
nothing on the other. In the case of curves the deep side was on the
inner side of the arc. Ogee curves therefore presented a difficult
challenge as the worker had to change from one side of the wheel to
the other and skilfully splice the two cuts in a way that did not
interfere with the design. |
|
|
Mitre profiled wheels made a 'V' shaped cut. |


Cutting wheels were lubricated with water and were run on a shaft supported by a wooden or iron frame. Small glass sheets were hand-held over the cutting wheel, while large sheets were held in a sling suspended from a counter-balanced beam on the ceiling above the cutting lathe, allowing the craftsmen to manage them with ease whilst engraving the design.
 |
|
| Detail of brilliant cuts made with a square profile wheel |
Once the design was engraved to the correct depth, the cuts were then smoothed and finally polished. Smoothing was done in a similar way to engraving using willow wheels and ground pumice. These wheels had to match the profile of the cut. Once smooth, the cuts were polished with a revolving fibre brush impregnated with a polishing compound, usually rouge.
Brilliant cutting was (and still is) a highly skilled and labour-intensive process. Each cut required a different wheel and sometimes these had to be custom-made to suit the particular job in hand. However, the process did not always stop there. With the exception of flashed glass (see the first illustration, top of page), most brilliant cut work had a frosted background. If this was to be of a single tone the sheet was usually mechanically abraded using emery flour in a process akin to 'emboss and ground' (see above). Frequently though, brilliant cut sheets were acid embossed either with a clear etch or white acid and triple emboss. Areas of the design were sometimes gilded and often the whole sheet was silvered to produce a decorative mirror.
The Victorians' delight in decorative richness has not been shared by subsequent generations who judged it to exceed the bounds of good taste. There were many poor examples of the craft, as there were in all the trades, but at their best, brilliant cutting and acid etching combined both originality and excellence in design and craft. Regrettably precious few examples have survived to the present day.
CONSERVATION AND RESTORATION
Before any intervention, repair or cleaning, a thorough survey of the artwork must be undertaken. This should include information concerning the glass and its condition, but also concerning the glazing method and condition of the frame. Attempts should be made to identify the work and date it. Glass decorators sometimes included a maker's mark.
A photographic record should be made and, if possible, a rubbing taken. In fact, taking a rubbing is a sensible precaution, even if cleaning or restoration is not required immediately, as windows are inevitably vulnerable to damage.
To take a rubbing, use detail paper and make small 'V' shaped cuts in the four corners. Place the paper over the glass and fold the cut areas back to expose the glass beneath. A low tack adhesive can be placed over these openings which will help hold the paper whilst the rubbing is made. Shoemakers' Heelball as used for blackening the heels of shoes provides the ideal medium. The rubbing should encompass the entire pane of glass, including the perimeter (the sight size) of the glass and the engraved pattern, as the position of the pattern in relation to the window opening is vitally important if the panel ever has to be remade.
It is also important to identify the type of glass treatment used. The effects of white acid and sand blasting (a much later technique) can look similar, but are quite different at a microscopic level. Sand blasting, a dry mechanical abrasive process, chips the surface of glass causing thousands of minute fissures and cracks which readily absorb grease and dirt. White acid on the other hand produces a uniform pock-marked surface that is therefore less prone to grease and dirt, and is more easily cleaned.
In the majority of cases the glass might only need gentle cleaning. Dust and grease may be removed by using a soft brush dipped in distilled water and dilute acetone or denatured alcohol. Standard methylated spirits should be avoided as the dye can leave behind a stain. It is always better to err on the side of caution.
If the work is in a public house it may also have a generous coating of tar from regular exposure to tobacco smoke, or if the window is prone to condensation it may have acquired mildew and other organic growths. Neutral soap and distilled water can be used to remove them. Modern day detergents should be avoided, and abrasives of any kind should never be used.
Decorators and builders also like to leave their mark, with spots of paint and brush strokes around reveals, and plaster or even cement deposits. These are more problematic to deal with and probably require specialist help in removing them.
If the glass is broken it is usually possible to have it conserved, but if necessary, a replica may have to be made. There are a limited number of specialist firms who can carry out brilliant cut and acid emboss work to an exceptionally high standard. It is certainly worth the effort to engage them and, considering the specialist and labour-intensive nature of the work, not prohibitively expensive.
Recommended Reading- P Dreiser and J Matcham, The Techniques of Glass Engraving, Batsford, London, 1982
- AL Duthie, Decorative Glass Processes, 1908, Dover reprint, London, 1982
- AC Frost and R McGrath, Glass in Architecture and Decoration, The Architectural Press, London, 1961