
Vertical Tile Hanging
Stephen Rickards
 |
|
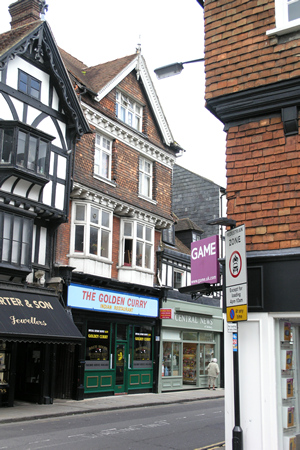
| In the centre, a late 19th-century Queen Anne Revival building in Minster Street, Salisbury with decorative hanging tiles, and in the foreground, the corner of a 17th century timber-framed building with plain hanging tiles |
Tile hanging first appeared in south-eastern England towards the end of the 17th century to provide weather protection for the thin panels of wattle and daub used for the walls, especially in exposed situations, and often on the upper storeys only. It is therefore sometimes known as weather-tiling. When clay roofing tiles became cheap and easily available they were adopted as a cladding panel over timber-framed walls more generally.
Historically, tile hanging is particularly associated with Kent, Surrey and Sussex, but it is also used in parts of Hampshire, Berkshire, Wiltshire and Buckinghamshire. The style was used more widely in the late 19th and early 20th century under the influence of the Arts & Crafts movement and the Queen Anne revival, and today it has become popular throughout the country, particularly at first-floor level, over modern timber-frame and block buildings to give a vernacular feel.
The plain tiles used historically and today are the same as those on roofs, typically 270 x 165 x 16 mm. Hand-made tiles usually had a camber in both directions which helped to cover irregularities in the timber walls and it is this camber which imparts much of the character.
Most of the older tile-hung buildings are timber-framed houses. The tiles are hung on oak laths, with the upper part of each tile often bedded into a lime and hair mortar known as 'torching'. Mortar is also sometimes used to fill the joints to make them more weathertight, although this reduces ventilation and smoothes shadow detail and texture, reducing aesthetic appeal.
The laths are nailed horizontally across the vertical parts of the timber frame. The tiles are hung overlapping to give a triple lap, so the bottom of one tile laps the middle of the one below and the top of the one below that. Where the members of a heavy timber frame are spaced widely, intermediate studs are needed to support the laths. However, in light frame construction the more closely spaced studs need no addition. Traditionally the oak laths would be riven, that is split from the timber along its length. These often appear surprisingly thin when compared to modern sawn sections, but are inherently strong because the grain is continuous, unlike a sawn section where any even slightly irregular grain is cut through, creating weak points. The slight undulation of the riven laths also adds character to the tiled surface.
Sometimes solid brick walls have also been tile-hung. This practical solution to lateral rain penetration and associated internal dampness is still used today. Traditionally, the tiles would be hung on timber battens plugged into the walls or fixed by wooden pegs, later nails, directly into the mortar beds.
When tile cladding was added to existing buildings which had jettied upper floors, the opportunity was often taken to build a new brick wall outside the lower framing timbers and in line with the tile hanging above.
 |
|
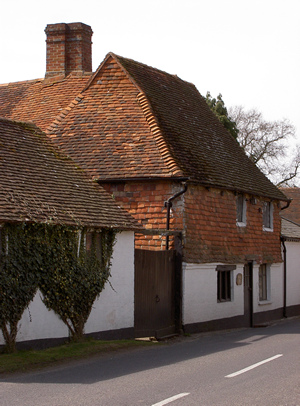
| Plaistow, Sussex: a typical town house with tile-hung first floor |
Most traditional tiles are terracotta in colour with variations through red and orange due to natural inconsistencies in material and firing conditions. Often the vertical tiles appear a different colour from those on the roof but this is actually due to different weathering patterns; rainwater runs off them immediately and they don't remain damp for long. Thus they tend not to suffer from the effects of moss, lichen and soot, retaining a colour nearer the original.
Usually square, the lower edge of some of the tiles used is often cut to a different shape and fixed to create a pattern or border. The most common is probably the half-circle, but different shapes would be combined for a more complex pattern or, perhaps more often, laid in several courses alternating. Other colours might also be used to create patterns in the same way. The many possible variations in shape and colour allowed enormous variety in appearance.
The machine-made plain tiles introduced by the industrial revolution tend to be much flatter than the significantly cambered hand-made tiles and have a very different character.
In the Georgian period, tiles were made to imitate the appearance of brickwork. Known as mathematical tiling, these were frequently used to 'face-lift' old half-timbered buildings. However, although technically speaking, these are a form of hanging tile, this is a subject area of its own, beyond the scope of this article.
The age of a tile-hanging is not always obvious as old tiles were often reused. However, the external angles of the walls may provide clues: in old work the corner tiles were usually simply cut and fitted together, and the corner was often formed with an exposed vertical timber fillet, wooden cover mould, or architrave. Today, specially-made angle tiles are available which produce a more weathertight detail.
Latterly, concrete plain tiles have been manufactured with a sand-finished face in a large variety of colours and shapes. Like machine-made clay tiles, these have a uniformity and, it might be said, appear flat and lifeless.
CONSERVATION AND REPAIRS
As with all conservation work, it is most important to identify the type of tile and batten before undertaking any repair or replacement. There is an enormous difference in appearance depending on whether hand- and machine-made tiling, as well as riven or sawn laths were used. It is not uncommon to find machine-made tiles, even concrete tiles, used to patch repair handmade coverings. Like using flatter, sawn battens in place of riven timber, this type of mismatch stands out, not least because of course all plain tiles are of very similar size.
 |
|
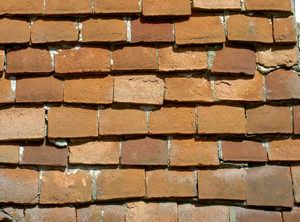
| Detail of the tiling showing mortar torching |
Several manufacturers make clay tiles by hand, so it is not necessary to use machine-made clay- or sand-faced concrete tiles inappropriately. It is also possible to obtain riven oak or chestnut laths.
Arguably, the main problem is poor maintenance. With correct regular maintenance, tiled finishes can last without major recladding for centuries. Usually it is the fixings which fail owing to decay in wood pegs or corrosion of metal. This causes any torching present to slip out and then the tile slips, exposing the battens and frame to the elements, with potentially dire consequences. Just one or two gaps can lead to decay in the battens or, worse, the framing. Tiles also may decay, particularly if under-fired. Fortunately, these tiles are much more easily replaced than most other building components.
Traditional corners are frequently a problem; the exposed mortar falls out or the timber architrave weathers and decays, allowing surface water to penetrate the vulnerable end grain of the battens, causing rot and failure of the finish at the corner. Although this is an occasional problem area, thought must be given before altering it. This is a small detail, but adding purpose-made corner tiles to finish the corner of a listed building in a more robust fashion will effect a significant visual alteration, which is not to be encouraged, and would require listed building consent.
New tiling should be laid in accordance with BS5534 parts I and II Code of Practice for Slating and Tiling, and BS8000 Part 6 Code of Practice for workmanship on building sites for roof, slate, tile coverings and cladding.
Tiles should be taken from different pallets and mixed over the elevation to achieve an attractive blend of colour. To avoid straight lines of colour, tiles should be laid across the elevation and not vertically.
Fixing battens on boarded or flat elevations must be supported on vertical counter battens to increase ventilation under the tiles and to allow free drainage of any water that might reach the underlining membrane.
 |
||
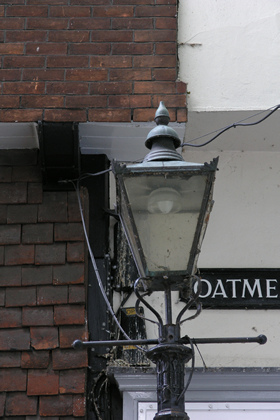
| A detail showing mathematical tiles above plain tiles |
The essential difference between plain-tile pitched-roof coverings and vertical tile-hanging is of course in the fixing. All vertical tiles should be held in position with two nails or pegs.
The bottom edge should be formed as a double layer: nowadays special eaves tiles are available for the underlayer, which finishes in the same manner as a roof, with a tilting fillet which is usually timber. The top of the tiling needs to be protected: this is usually achieved with a lead cover flashing which should be dressed down over the top edge.
At abutments which finish square, the tiles should be cut and weathered with lead soakers or cover flashings as necessary, leaving a neat narrow parallel gap between the tiling and the abutment. At raking abutments, which would be found on a gable wall for example, the tiles should be splay cut. Manufacturers usually recommend that, to maximise security of fixings, ends of courses should finish with special wider tile-and-a-half tiles and splaycut full tiles where necessary to avoid the use of small triangular pieces of cut tile. However, be aware; the wider tile-and-a-half is not a traditional size and changes the appearance of the detail, particularly because the wider tiles' camber does not sit uniformly with others of standard width. Manufacturers can produce special angle tiles which can be used to minimise cutting.
Mention should be made of Winchester cutting. This refers to the way the end tiles are finished at a gable abutment. The normal finish is to cut the end tile at an angle on one side, leaving the other edge perpendicular so that it sits coursed level with its neighbours in the row. This can look uncomfortable visually, and often results in small triangular-shaped tiles which are difficult to fix properly. In the Winchester cut, the penultimate tile is also cut on the splay so that the end tile becomes inclined relative to the row. This provides a pleasing visual effect and allows the end tile to be a satisfactory size in all rows. However, an additional tiling batten fixed parallel to the edge of the roof is required to secure the last tile.The cut tiles in both methods will lose one of their preformed peg holes and will need to have a second fixing hole drilled on site.
Generally, however, all new tiling should always match the original detail, unless it is clear that problems have arisen as a result of mistakes made in the past. Bear in mind that a detail which has already lasted 100 years or more can be relied on to last another 100 years, provided that it is properly understood.
~~~
Recommended Reading
- RW Brunskill, Illustrated Handbook of Vernacular Architecture, pp60-1and p193, Faber & Faber, London, 1970
- Alec Clifton-Taylor, The Pattern Of English Building, pp279-281, Batsford, London, 1962