
Chimneys and Flues
Russell Taylor
 |
||
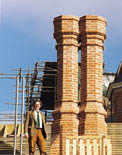
| The author (6'3'' tall and no lightweight) next to two new chimneys, traditionally constructed in the Tudor manner - emphasising the fact that chimneys can be large, heavy structures. The gap between the shafts, the 'wind joint' is a traditional feature. It is a moot point whether or not it assists the aerodynamics of the stack structure. |
Chimneys and flues are subjected to intense heating and cooling cycles, condensation and aggressive chemical reactions caused by hot flue gases. Above the roof line the chimney stack is exposed to the full force of the weather. To withstand such conditions, maintenance and repairs need to be of the highest standard, and it is important that design elements of such significance are conserved properly. Yet works are often badly executed by unqualified contractors using inappropriate materials and ill-conceived methods. The result can be damaging to the character and fabric of the building, and may even be dangerous.
This article describes some of the most common problems and suggests how they can be tackled.
HISTORIC DEVELOPMENT
Although flues have been in use since ancient times, many early domestic fires were open hearths where the smoke billowed around inside the building. The widespread adoption of flues in the late medieval period coincided with an increase in the use of brick, which is better able to withstand the temperature of a domestic fire than stone because it is a fired material. Even in stone building areas brick was often used for the chimneys and flues, particularly from the 19th century onwards.
The earliest chimneys were large, crude structures serving a single fire, but as more fireplaces were required, chimneys became smaller and more efficient, combining several flues, each serving a separate fire.
At first the usual domestic fuel was wood, but coal was used surprisingly early - in London from the mid-17th century and everywhere except rural areas by the mid-18th century. The change to coal resulted in smaller fireplaces as more heat is given off by a smaller quantity of fuel, and grates were required because coal, being denser than wood, will not burn unless there is an oxygen supply under it.
In the 17th and 18th Centuries, when coal was the principal fuel used, grates were really simple baskets combining fire-dogs and fire-back in a single unit. Then came cast iron hob-grates and finally the various types of register grates based on principles established by Count Rumford in 1797. These grates had a narrow throat for more efficient flue draught, the fire was pushed forward to the front of the hearth and the sides were splayed to radiate heat more efficiently. Register grates became the standard from then on.
By the 18th century most chimneys were built with 12" flues, and this size was reduced still further following Count Rumford's innovations. As a result the usual dimension for a brick flue came to be just 9 x 9" (one brick by one brick) and the wall between the flues, the 'withe', was usually 4½" (half a brick). Brick dimensions often also govern the dimensions of quite elaborately shaped stacks so for any replacement bricks the original Imperial sizes must be precisely matched.
Flues are lined with 'parging', a render mix used to prevent gases escaping through mortar joints and cracks in the structure. Parging is always somewhat roughly executed and is usually of the same mix as the brick mortar, because it is done piecemeal as the chimney stack rises. However, special mixes were also used and are found in older and larger flues. The first edition of McKay's Building Construction in 1944, for example, recommended a mix of one part lime to three parts sand with ox hair, mixed at the rate of one pound of hair to three cubic feet of mortar. An alternative mix comprised one part lime to two parts sand and one part cow dung.
DEFECTS
In view of the extreme conditions both internally and above the roof line, defects in chimneys and their flues will inevitably arise. The following is not an exhaustive list but it includes some of the most common faults. As with all conservation work no two cases will ever be the same; the remedies suggested illustrate general principles and each case must be judged on its own merit.
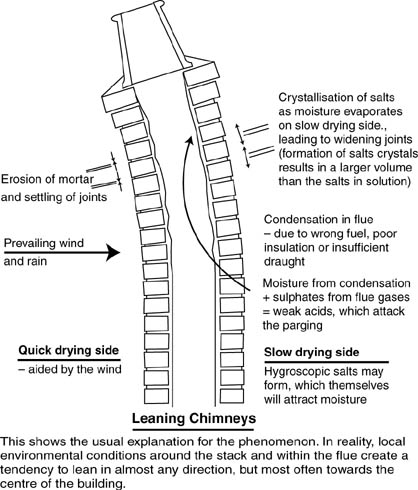
LEANING CHIMNEYS
A combination of erosion, acid attack and salt crystallisation are liable to cause a chimney to lean (see illustration). The BRE Good Repair Guide says any chimney that leans more than 1mm in 100mm is unsafe. This is perhaps a little too cautious and where historic buildings are concerned, one may wish to apply the middle third rule to the shaft wall around the flue. Thus where the shaft wall is half a brick thick, a lean of 35mm could be tolerated, but if in any doubt, consult a structural engineer.
 |
|
Where repairs are impossible, the remedy of last resort is to rebuild the stack from some convenient point - say the top section only or completely from below roof level - using as much salvaged material as possible. To comply with The Building Regulations any rebuilt section will have to have an internal diameter of 200mm (although 185mm is acceptable for a relined flue), so some ingenuity may be required to incorporate a flue liner within the original stack dimensions.
If it is decided that the existing lean on a stack can be tolerated the factors inducing the lean should be stabilised. The flue should be lined (see Parging Failure below, and broken or decayed bricks should be cut out and replaced. In slender stacks it is a wise precaution not to take out too many bricks at a time (sometimes no more than one at a time) and the new mortar must be allowed sufficient time to achieve strength before proceeding with the next area of cutting out. Cracks should be repointed and all 'defective' mortar raked out and repointed.
'Defective' mortar may be taken to include that which is loose, crumbling or cracked. As a general principle (and this applies to all repointing, not just on chimneys) if a lime mortar is difficult to remove, repointing is not necessary. Any hard cement mortar will be more difficult to remove. Take care not to damage the edges of the brick or stone. Rake out to a depth of 25mm or twice the width of the joint whichever is the greater; do not rake out deeper than 35mm. The strength and lime content of the mortar will depend on the hardness of the brick or stone, in accordance with usual good practice for repointing. If it is necessary to add some cement to the mix, use sulphate-resisting cement. Similar mixes will be used for rebuilding stacks.
Once a leaning stack has been stabilised, some periodic checking (for example during quinquennial inspections) is advisable.
VERTICAL CRACKS
Thermal expansion of the flue lining can cause vertical cracks to appear in the structure of the chimney, particularly where the flue is hidden within the thickness of a wall and where its actual presence has in any case introduced a point of weakness. Where this is the most likely cause of failure (and not settlement for example), the usual remedy is to install a flue liner (see Parging Failure below) which will provide some thermal insulation for the wall structure. Then point-up and make good the crack.
DEMOLISHED CHIMNEY BREASTS
In houses and flats which have been poorly converted it is often discovered that the chimney-breasts have been removed in habitable rooms to create more living space, without removing the stack above. This is a classic error, committed either through laziness or for the more laudable reason of wanting to retain the original roofscape. In either case, if the remaining stack has not been properly secured both it and the walls below it will be unstable.
Chimney breasts and fireplaces in particular form a focus for the architecture of the interior and ought to be rebuilt. If, however, the owners object, the simplest solution is usually to introduce supporting beams bearing onto suitable walls or brackets to take the load of the stack lower down the wall.
DEFECTIVE POTS AND FLAUNCHING
Chimney pots are held in place by a great glob of cement-rich mortar, the flaunching, which also acts as the weathering for the top of the stack. The flaunching decays more readily than the pots, usually by frost action. It is a simple matter to replace the flaunching but take care not to damage the pots when trying to clean off the previous hard cement mortar flaunching.
The only practical solution for broken chimney pots is facsimile replacements. A wide range of designs is available from manufacturers and specials can be made to order to match originals. (Original chimney pots are often to be seen on abandoned and little-used flues.) Architectural salvage yards may also provide a useful source of replacements.
PARGING FAILURE
The failure of parging may become apparent in a number of ways: debris in the fireplace, a blocked or partially blocked flue, or smoke escaping into other flues. If, as noted earlier, the chimney is leaning or there are vertical cracks associated with the line of the flue some deterioration in the parging is inevitable, and it will be necessary to reline the flue. Relining, it should be noted, can also help with other problems, such as unsightly staining on chimney-breasts. It is also essential where flues are to be used for gas-effect fires and certain other appliances such as central heating and domestic hot water boilers, as required by The Building Regulations and The Gas Installation Regulations.
There are three basic types of flue liners: cast in situ refractory lining; sectional, solid liners, and metal liners.
Cast
In Situ Refractory Lining
Cast linings are relatively simple to install and usually the
least expensive. A toughened rubber tube is inserted in the flue from
top to bottom and inflated. Every two metres and at bends the structure
of the flue is temporarily opened up and refractory blocks are inserted
to ensure that the tube is correctly positioned. An insulating, refractory
concrete mix containing pumice or vermiculite is then poured into
the flue around the outside of the inflated tube. When the mix has
set the tube is deflated and removed leaving a smooth cylindrical
flue.
The tubes are available in a wide range of sizes to match the needs of different flues, fuels and heating appliances. A standard, existing 9 x 9" flue will accommodate a 185mm diameter cast in situ lining which satisfies the requirements of Part J of The Building Regulations (Part F in Scotland) for both a solid fuel open fire and a gas-effect decorative fire. However, one needs to be a little cautious about the reduction in area of the flue as the ratio of flue size to fireplace opening is critical. A smaller flue will result in a weaker draught than a large one, and if the fireplace opening above the fire is large, the effect of the draught on the fire itself will be dissipated. In an extreme situation the air-flow up the chimney would by-pass the fire altogether.
Generally the ratio of cross sectional area of fireplace opening to flue should be not more than 8:1 (but 6:1 for a single storey flue, as in a bungalow or on a top floor). Most register grates are 12" to 18" (300-450mm) wide and 18" to 22" (450-500mm) in height above the grate, so all but the largest will have a fireplace opening area suitable for a flue as small as 7½ (185mm) diameter (giving a ratio of 5:1 for a 12x18" opening and 8.3:1 for an 18x22" opening). However, fireplaces built before the 19th century and those which served a kitchen range are likely to have larger openings and the flue size will need to be checked by calculation.
Cast linings have several disadvantages: the water introduced in the mix can cause salt migration and decay; their success depends on the skill of the installer to ensure that the tube is centralised throughout the length of the flue; and once installed they are almost impossible to remove.
Sectional,
Solid Liners
Made of refractory concrete, pumice concrete or terracotta, sectional
solid liners are only likely to be used if the existing stack is particularly
large and straight, or if the stack is rebuilt, in which case they
will be built-in as the stack is rebuilt. As a lining for an existing
chimney they have the advantage that they are reversible, highly durable
and do not require the introduction of large volumes of water into
the structure.
Metal
Liners
There are three basic types of metal liners: rigid metal liners, flexible
double skin liners and gas flex.
Rigid metal liners are usually used to reline large flues for wood burning stoves. The liners are stainless steel with a minimum thickness of 1mm and are installed in sections with special clips at the joints. The space around the liners is back-filled with perlite or vermiculite.
Flexible double skin liners are also made from stainless steel. The inner skin is smooth and the outer corrugated. They are simply installed by being pulled either up or down the flue on a rope and the ends are then fixed in position; they must be installed the right way up. The liners are available in a range of diameters from 100mm to 400mm and they are suitable for solid fuel, wood or gas effect fires. For solid fuel and wood, the space around the liner is normally back-filled with perlite or vermiculite but the fill may be omitted if you are confident that there will be no condensation. For gas effect fires the void around the liner is left unfilled but must be sealed at the top and bottom.
Gas flex is a lightweight single skin liner, for use only with closed gas fires and boilers. If a closed gas fire or boiler is being removed and replaced with something else, always investigate which type of liner has been used.
Like solid, sectional liners, metal liners are reversible and do not involve the introduction of water into the structure. They involve less reduction in flue area than solid sectional liners and flexible metal liners can accommodate bends in the flue.
DAMP
Damp causes problems however it enters a flue, whether the flue is in use or redundant. The moisture combines with sulphates deposited inside the flue as a result of combustion to form weak acids. These acids attack the lime in the parging and the mortar joints, as well as the brickwork itself. They also form hygroscopic salts (salts which attract moisture).
In a well-ventilated flue, warm air rises constantly, drying out the chimney. Moisture levels increase rapidly in a redundant flue if either the fireplace or the chimney is sealed. It is therefore essential to maintain ventilation to all flues, including redundant ones in particular, top and bottom.
Occasionally damp will penetrate the brickwork to form tarry stains on plaster and wallpaper inside the building. Remedial treatment depends on the severity of the staining. As a first step the flue should be lined and the plaster stripped from the wall to allow the wall to dry out as much as possible. If the staining is moderate the wall can be replastered once it has dried out. If it is comparatively severe new finishes should be isolated with some form of battening.
A cast in situ flue liner, because it also introduces water into the flue during its construction, may cause tarry stains to appear or make existing stains worse.
There are two basic causes of damp in chimneys: ingress of rain, and condensation.
Condensation
Moisture which condenses can cause a problem in flues that remain
in use. The burning fuel produces water vapour. If the flue is very
tall, wide or particularly cold, the flue gases may cool to the point
where the moisture vapour condenses within the flue. This happens
particularly when wet fuels such as freshly cut timber are used.
Condensation-related damp can usually be reduced by introducing a flue liner, as this both adds some insulation to the flue and reduces its surface area.
Ingress
of rain
There are three likely routes by which rain can enter the structure:
simply down the flue and into the building; around defective flashings
between the chimney and the roof; or through the wall of the chimney
stack itself where the fabric is too thin or too porous to prevent
penetrating rain from getting around the flashings.
Rain can usually be prevented from coming down the flue by introducing a fairly discreet capping. Types are available for flues which are no longer in use (providing ventilation only) and for flues still in use. If it is still in use, the draught may be affected by the capping, causing the fire to smoke, so some experimentation may be required. When a flue has been relined, rainwater which had previously been soaked up by the old parging may run down the new flue as if it were a drainpipe. Rainwater in the fireplace may be a problem after a flue has been relined.
Where flashings are defective, these should be thoroughly inspected and repaired in accordance with usual good practice and the recommendations of the Lead Sheet Association. However, all too often inspection reveals that penetrating rain is getting around an otherwise perfectly sound flashing. Such problems are more difficult to solve, and a degree of intuitive judgement must be used. The BRE and the Lead Sheet Association now recommend taking a sheet of lead all the way through the structure of a chimney stack just above the roof-line, but this will not usually be an appropriate solution in conservation work. However, the introduction of higher (taller) flashings and ensuring that all pointing is sound may help.
Insufficient
Draught or Down-draught
If the fireplace is used as intended as an open fire the flue must
draw properly and take away all smoke and fumes. The National Fireplace
Association and the Solid Fuel Association produce excellent leaflets
identifying possible problems and suggesting remedies. There is no
point repeating their advice but always approach the suggested remedy
with sensitivity. Three areas demand particular attention where an
historic building is concerned: alterations to the fireplace, the
use of incongruous chimney pots and the introduction of vents.
Decreasing
the size of an overlarge fireplace opening
The standard solution for an overlarge fireplace opening is to set
the fire on a platform and place a metal canopy over the grate. However,
such visual intrusion must be considered a last resort and should
always be designed with care.
In practice it is often the height of the fireplace opening, rather than its width which is most critical. At Arundel Castle, glass quarries within a metal framework have been fitted under the lintels of many of the fireplaces, successfully curing draught problems.
Replacement
pots to increase up-draught
Special pots are available which are designed to improve up-draught.
Others are designed specifically for gas terminals. In either case,
always try to obtain a design which is close to that of the original.
Room
vents to increase the air supply to the room
The quick-fix solution to ventilation is a hole in the wall with a
brass grille on the inside and an air brick on the outside, but this
can be visually intrusive in a fine interior. Think laterally: the
air supply can come from any other part of the building which is ventilated
and does not contain a fuel burning appliance, such as a corridor,
roof or floor space.
OTHER USES FOR FLUES AND CHIMNEYS
- Flues and chimneys which are not to be used for open fires may be
retained, conserved and put to other uses.
- The most obvious use is for gas effect decorative fires or for boilers.
- A redundant, ventilated flue acts as 'passive stack ventilation'
now required by The Building Regulations. This should almost be
as good a reason as any to retain flues and keep them ventilated.
- A redundant flue can also provide a route for soil and vent pipes,
bathroom vents and kitchen vents. The new vent should be a separate
duct within the flue allowing the original structure and lining
to benefit from passive ventilation.
- In the SPAB headquarters in Spital Square there is a pressurised
staircase fire escape system. An essential part of the system is
the smoke ventilation from any room in which a fire has been detected.
Obviously and sensibly this is done through the existing flues (cf
'Fire Protection' by Alan Parnell in the 1993 edition of The Building
Conservation Directory).
~~~
Recommended Reading
[Editor's note: the legislation and guidance documents listed below may have been superseded since this article was published: please consult the relevant authority/organisation to ensure that you have the latest version.]
- British
Standards:
BS 5871 Part 3 1991: Decorative Fuel Effect Gas Appliances of Heat Input not Exceeding 15KW
BS 6461 1984: Installation of Chimneys and Flues for Domestic Appliances Burning Solid Fuel
BS 8303 1986: Code of Practice for Installation of Domestic Heating and Heating and Cooking Appliances Burning Solid Mineral Fuels - BRE Good Repair Guide 15: Repairing Chimneys and Parapets
- The Building Regulations (England & Wales) 1991 Part J (as revised)
- The Building Standards (Scotland) 1990 Part F (as revised)
- The Georgian Group Guides, No 9: Fireplaces
- The National Fireplace Association (Tel 0121 200 2100), Technical
Information Leaflets:
No 1 - Making the Most of Open Fires
No 2 - Chimney Problems and How to Cure Them
No 3 - Essential Air Supply
No 4 - Lining Old Chimneys - The
Solid Fuel Association (Tel 01773 835 4000), Solid Fuel Guides:
3.2 - The Guide to Solid Fuel Period Fireplaces
3.3 - The Guide to Curing Chimney Problems - G Williams, SPAB Technical Pamphlet No 3: Chimneys in Old Buildings, SPAB, London