
Victorian and Edwardian Geometric and Encaustic Floor Tiles
Peter Thompson
 |
|
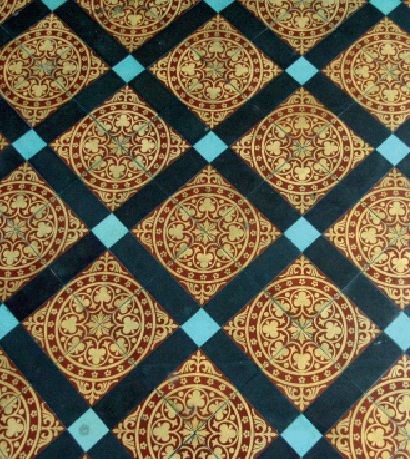
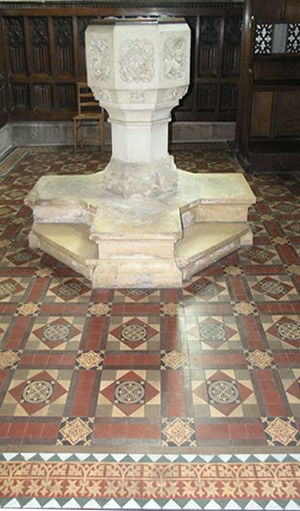
| Some of the finest geometric and encaustic tiled schemes are to be found in Victorian churches, as here at St John’s, Bath. |
FROM THE 1860s geometric and encaustic tiled floors started to appear in public buildings, churches and the more expensive Victorian villas. Their rise to fashion was assured by their use in such prestigious buildings as the Victoria and Albert Museum, and by the 1890s they had become an essential feature in the most ordinary Victorian terraced houses from Dover to Aberdeen. As well as adding prestige and colour to a Victorian hall, they were also remarkably practical. Although it’s improbable that the average Victorian builder gave much thought to the lifespan of such a feature, it is a fact that most domestic interior tiled floors have survived 100 years of family wear and tear. With a little care, they will probably be good for another 100 years. There can be few other floor finishes that offer such durability, while looking so good.
Although these floors fell out of fashion during the 1960s and ’70s, when many of them were covered over, they are now being rediscovered by their present owners and restored to former glory. Although many need a significant amount of work carried out, around 9 out of 10 are generally repairable.
FLOOR
STRUCTURES
Large
buildings and ecclesiastical buildings normally have a solid or vaulted
floor structure that is integral to the structure of the building itself.
The Victoria and Albert Museum, for example, has solid bases over vaulted
cellars on the lower floors. Upper floors used a variety of structures
depending on the spans involved, ranging from vaulting to suspended
timber. Some smaller buildings may have part groundbearing slab bases
and part suspended timber structures.
Domestic properties from 1870 to around 1910 usually had a modified suspended timber floor. Joists were laid at the same level as those for surrounding boarded floors, with battens and pugging boards added at the bottom of the joists to form troughs. The troughs were then packed with a lime pugging, and the tiles laid on a wet screed of around half an inch (12mm) pulled over the top.
A few floors have been found with iron joists and a cast slab of some sort, others supported by large slabs of York stone, all on brickwork piers. Where flights of steps were tiled, the steps themselves were normally bridging York stone slabs keyed into the brickwork either side, with additional brickwork supports for larger spans. Risers could be York stone, rendered brick, marble or slate. From 1900 onwards, cast slab bases slowly started to replace the suspended timber floor. These bases were nominally ‘concrete’ but often consisted of a great deal of lime, with a variable proportion of broken brick, no doubt left over from the main building work. Such slabs were usually laid directly on the ground and not tied in to the building structure at all.
 |
PLAIN
TILES
Tiles
were made from clay (often locally sourced), and always had a square
(or almost square) edge. This square edge (in section) is significant
and is the key to the flat surface that these floors have, unlike some
modern reproductions. There were many manufacturers and it is not uncommon
to find a mix of different manufacturers’ tiles within one floor. There
were around ten common colours, but there could be many variations in
shade, particularly in reds and buffs. Plain coloured tiles tend to
be more durable than encaustic tiles as they are generally harder (see
below). Some plain colours wear relatively more quickly, and it is quite
common to find a floor showing very little wear, except for the buff
tiles, which may all be dished. Blue and green tiles were used more
sparingly, as they were – and still are – expensive to produce, requiring
a white clay and much expensive dye.
Glazed tiles are rare, as most floor tiles were unglazed. In ecclesiastical floors, however, the odd glazed tile was sometimes used, most often a green one. Strangely these inserts were often made using a green glaze on a buff tile.
Glazed tiles can also be found in geometric tiles used for fireplace hearths. The vast majority of tiles used only 90º and 45º angles. Dimensions were fairly constant, all flowing from a six inch square, via Pythagoras’ theorem – so squares are found in 6”, 41/4”, 3”, 21/8”, 11/2” and 1”. The dimensions of octagons, hexagons, trapeziums and triangles all matched up to these. Rectangles were commonly in 6” lengths for border edges in 1”, 2” and 3” widths, plus 41/4” by 21/8”, which was a popular size for the Edwardian red herringbone field design. There were nevertheless some small variations in these sizes.
A few manufacturers produced some unusual shapes, although curved edges are rare, as they require a matching tile to fit to the curved side. A little more common are designs worked to include tiles with 60º/120º angles.
Geometric designs can use a very large number of small tiles with up to 600 tiles per square metre, so the hall floor in a fine Victorian terraced house could easily have around 4,000 tiles in it.
 |
|
 |
|
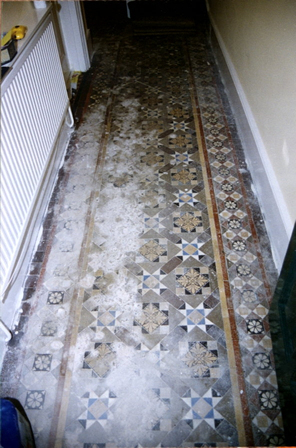
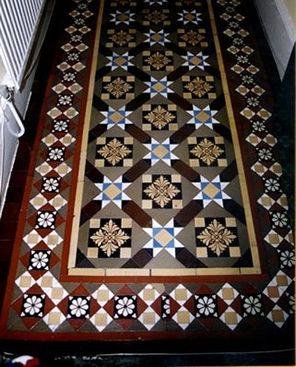
| Typical late Victorian domestic tiled schemes: A hall floor before (top) and after (above). |
ENCAUSTIC
TILES
Many
of the manufacturers of plain geometric tiles also made encaustic (patterned)
tiles, using a medieval technique re-invented by Herbert Minton, which
involved inlaying layers of different coloured clays to create a design.
His company was particularly successful and ‘Minton’ is the name most
commonly found on the back of original encaustic tiles, although there
were several different companies which incorporated the Minton family
name. Encaustic tiles were most commonly two-colour that is to say the
body of one colour (red for example), impressed with a pattern filled
with a different colour (such as buff). However, there are plenty around
with three and four colours, and you can find them with five or six
colours with a bit of searching – the Palace of Westminster has good
examples.
Encaustic tiles were used relatively sparingly in geometric design as they were always much more expensive than plain geometrics tiles. Such tiles can show some excessive wear after a hundred years or so, as the secondary colours were added in the form of liquid clay slips, and so were often softer than the main body of the tile. Different inlay colours wear at different rates, so it is quite common to find one particular colour completely worn away, and ridges appearing between the other colours in the design.
ORIGINAL
TILE LAYING
Most floors
were laid to a very high standard, although on careful inspection, the
odd mistake can usually be found. Grout lines are usually so fine that
many people think these tiles were butted together. That was rarely
the case, most floors were laid with a fine grout line to allow small
dimensional differences.
Tiles were always laid in a wet mortar screed, and the skill of the tilers can be appreciated in the flatness and alignment of the tiles. Designs were normally set out centrally from the main entrance. Again, the skill of the tilers in setting out must also be recognised. The bedding screeds originally used were normally very hard. Some of the earlier floors (particularly in the Midlands) used a softer lime based screed, but after around 1880 almost all floors that have been encountered in the South East used a hard lime and Portland mix.
COMMON
FAULTS, CAUSES AND REMEDIAL WORK REQUIRED
Loose,
broken and cracked tiles are the most common faults found in Victorian
and Edwardian tiled floors. Individual loose and broken tiles are normally
the result of wear and tear and can be simply replaced. Wear and tear
can of course embrace impact damage, where something heavy has been
dropped on the floor. In such cases, the exposed bedding needs to be
closely examined, to see if it is showing cracking or any sign of sinking.
Larger areas of loose tiling are normally due to some kind of movement in the floor structure. As the screed used to bed the tiles is normally very brittle, tiled floors cannot tolerate any significant deflection without cracking. Once the screed cracks, the adhesion of the tiles to the screed will begin to fail. The cause of movement must be identified and corrected before any re-tiling takes place. In particular check:
- the joist pockets for movement
- all the timbers for wet or dry rot, or insect infestation
- all the nailed joints
- all the fox wedges
- the nailing to all battens
- the condition of pugging boards
- for removal of original cellar partitions below (timber partitioning often added significant stiffness and even brick piers may have been removed)
- for adequate support to wall plates supporting joist ends
- for evidence of subsidence or settlement.
 A garden path with geometric tiles |
It is easy to detect if there is any ‘bounce’ in the floor by kneeling on it and banging the floor with the ball of your hand. If you can feel the floor vibrating through your knees, then it has too much bounce in it. The bounce must be stopped before any repairs to tiling takes place.
Work to the tiling can begin once the floor structure has been secured. Loose tiles should be lifted carefully as it may be possible to reuse them. Cracked and damaged tiles that are still firmly fixed will have to be cut out with a hammer and chisel. This must be done very carefully as collateral damage to adjacent tiles is likely.
Any mortar that has been used to infill where tiles are missing should be carefully cut back to the existing screed, but no further. Such infills are usually relatively soft and easy to remove.
If at all possible, removal of any of the existing screed is to be avoided. As this is normally very hard, the process of removal will often cause further areas of tiling to come loose. To ensure that there is room for a thin bed adhesive, the tiles should be thinned rather than the screed by taking off 2 to 3mm from the back of the tiles with a water fed diamond face grinder.
If there is evidence that the screed is breaking up or losing its adhesion to the pugging below, it is worth impregnating the screed with an acrylic based resin to consolidate it. When carrying out such an operation, some of the resin may penetrate right through the floor, therefore anything stored below should be covered or removed. It can also be useful to resin treat the exposed edges of existing tiling once damaged tiles or screed has been cut out. Large cracks in the screed may require an epoxy mortar repair, or some replacement of areas of screed.
Post-1900 solid ‘concrete’ bases can be the most problematic, and extensive failure or movement can mean the end of the floor. Very often the ground supporting the base was ‘made up’ and poorly compacted. Subsequent shrinkage can often leave substantial voids beneath the base. Considerable movement of part or the whole of the base is found to have taken place, as can be determined by checking the levels against the line of the skirting. If the floor has cracked across a corner and dropped, it may be possible to remove this area and lay a new section of base, but the vibration caused during the removal process may cause failure to further parts of the base. Tapping across the floor with a metal object can reveal whether there are voids beneath the base – if there are, it is not generally practical to rectify this without removing and replacing the whole floor.
It should be noted that, unless the tiles are laid on a soft lime bed, taking up and relaying the original tiles is not a practical proposition. It is likely that at least 75 per cent of the tiles will be damaged during the taking up process, and cleaning off the mortar residue will damage more. If repairs cannot be made without wholesale removal of tiles, there may be no choice but to replace the floor with a replica – as this approach may be far more cost effective.
Once the base problems have been addressed, the tile laying can commence. Areas should always be dry laid first, before attempting to fix, as some tile dimensions may need adjusting to fit the space available. A thin bed cementitious floor tile adhesive should be used to fix the tiles and the levels and alignment of points checked frequently with a straight edge. A fine cementations grout should be used. Usually a dark grey grout will be best, as the original grout will have dirtied down to almost black. Light grey grout can make an area stand out as repaired, until the grout dirties down.
The materials mentioned may have to be modified if the conservation policy for the building dictates the use of traditional materials only. However, the use of lime based bedding for tiles should be undertaken with caution – setting times are very extended even if an hydraulic lime is used, and the floor may have to be out of use for some weeks.
CLEANING
AND SEALING
When
the floors were new, they were generally scrubbed and waxed or oiled
every week. The surface seal was important for internal tiling, as natural
clay tiles are a little absorbent. It is usually many years since the
floor was regularly waxed or oiled, so dirty washing water will have
been absorbed into the tiles. Intensive cleaning to remove this dirt,
and then sealing to prevent further absorption will generally transform
the appearance of the tiles.
 |
|
| Original late Victorian tiles - still looking good after 100 years |
All substances to be used for cleaning and finishing tiled floors should be carefully considered in conjunction with any applicable conservation policies and with due deference to the historic significance of the floor and its surroundings. For example, finishes to painted or polished skirting boards, architraves and doors may be too delicate to allow the use of paint stripper in the vicinity and wallpapers may need protection from splashing. Although some chemicals are very effective their use may not be permitted by supervising conservation bodies. There are also Health and Safety issues to consider. As a general rule, good ventilation of the area is necessary, both to avoid build up of chemical fumes and to ensure prompt drying.
Tiled floors should never be ‘soaked’ with large volumes of chemicals or water as this could eventually loosen tiles, damage substrates and even cause structural damage. All cleaning should be done with as little liquid as possible and any surpluses mopped away immediately.
A detailed inspection will reveal if there are any paint splashes from decorating work – there normally is. These should be cleaned off with a chemical paint remover. Clean treated areas with plain water to remove paint remover residue.
The main clean should use an intensive alkali based cleaner specifically tailored for unglazed tiled floors – there are several different makes on the market. Note that these are normally diluted with water, and start off with the lowest concentration specified. If necessary, the strength of the solution can be increased. Such cleaning agents work better if a low speed scrubbing machine with a plastic scrubbing pad is used, but hand pads work well – it’s just more strenuous. Work with a hand pad will be needed if there are dished tiles that the machine pads cannot get into. Clean relatively small areas at a time and when each area has been well scrubbed, rinse several times with clean water and mop as dry as possible. Once the whole floor has been treated, do it all over again. Throughout this process it is most important to monitor the cleaning solutions and rinsing water. Change them frequently as they as get dirty.
Acid cleaning solutions can be useful, especially where cement based levelling compounds have left residue on the surface of tiles. Only use acids where there is no danger of damage to the fabric or finishes of the building. Again only use small quantities and in the weakest possible solutions. Remove acid solutions as quickly as possible, rinse with water and then clean the area again with an alkali based solution to neutralise the acid.
Once the floor is clean, it must be sealed. Acrylic sealer/polishes are perhaps the best option today. They are easy to apply, quick drying, the amount of sheen can be tailored to your preference by altering the number of coats and they are durable subject to correct maintence. Best of all, these sealer/polishes are non-permanent and readily removable.
Over the last ten years, various television programmes have suggested strange mixtures of natural waxes for these floors. Waxes should be avoided. They trap dirt, discolour as coats accumulate, can be slippery under certain conditions and demand a lot of maintenance.
Some authorities suggest the use of microcrystalline waxes, presumably on the basis that this is a more traditional finish. However, such waxes are modern chemical products – they are no more traditional than an acrylic finish. They are also considerably more demanding in terms of subsequent maintenance requirements. If a traditional finish is required, a colourless oil rubbed in is a reasonable compromise, but be prepared to re-apply it once or twice a week.
It should be noted that exterior tiling should never be sealed, as it can reduce the frost resistance of the tiles.