


Carved Joinery
The Conservation and Repair of Historic Timber Carving
Alan Lamb
 |
|
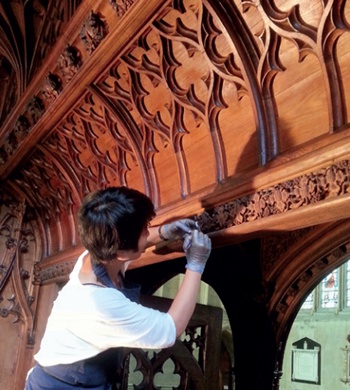
| Scribing a template for replacement carving, New College Chapel, Oxford |
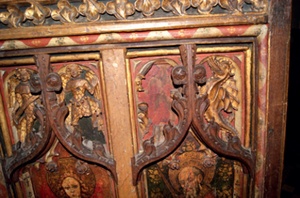
Our historic buildings contain an extraordinary variety of carving on joinery, from the Rochester choir stalls of 1227 and the fine wood carving of Grinling Gibbons (1648-1721), to the interiors of the Arts and Crafts movement. Carving styles and joinery components have undergone many changes but the basic techniques used in their making have generally remained remarkably consistent. The technical issues faced by conservators are therefore generally the same whatever the age of the carving, but the ethical issues can be highly contentious, particularly where the question of whether and when to replace missing carving arises.
In historic buildings that have remained in constant use, ongoing small losses to delicate carvings are almost inevitable. In this context the replacement of missing carving is a necessary step if our first priority is to stabilise ongoing aesthetic deterioration and preserve a space that we value highly for its appearance. Different priorities would apply when considering a museum piece in un-restored condition, preserved in a protected environment.
The decision to replace a missing component in a historic building should always be a considered one. The question assumes the conservator has the skill and sensitivity to produce a carving that matches the quality of the original and that there is a good reason for the intervention. In all cases the decision has to balance the competing priorities of the aesthetic, historical and physical integrity of the object in a way that is appropriate to the object’s setting and use.
Aesthetic and historical considerations might include the general level of finish in the room, how much the losses detract from the original design intention, the symmetry of the object, and how closely we can reference the new carving to existing features or other evidence.
Physical considerations might include the current use of the room, the condition of its support, and the state of its environment. A diagnostic assessment or treatment plan should always look at the carving in the context of both the structure it is part of or attached to, and the fabric of the building that supports and contains that structure.
HISTORIC CONSTRUCTION TECHNIQUES AND MATERIALS
Mortice and tenoned frames with unglued pegged joints and panels were the most fundamental component in the construction of screens, wall panelling and choir stalls in the Middle Ages. The frames could be decorated with carved or pierced panels and the jambs could be extended with other layers of timber to form arches and other carved decorative features. In 17th- and 18th-century joinery, doors, reveals, shutters, soffits and box pews were framed, while architraves, entablatures and chimneypieces were often of simple plank or box-frame construction, with elaborate carving fixed to them with nails or metal pins. Carved elements could be made up of several layers glued together, either before or during the carving process.
 |
|
| Repaired 16th-century panelling with new panel in background, and (below) the back of the panelling showing its repair. | |
 |
The species of timber commonly used in carved joinery are outlined below.
European Oak Quercus robur Until the last quarter of the 17th century oak was by far the most commonly used timber in carved joinery. Most would be English in origin but from the mid-14th century onwards high quality quarter-sawn oak boards known as wainscot were imported from Europe. These sawn boards were used for doors, window shutters and panelling.
Deal (Pine, spruce and fir) From the 16th century, the term deal was used to describe any, ready-sawn coniferous timber imported from the Baltic. Red deal or yellow deal implied European redwood, Pinus sylvestris (Scots pine). This is by far the most common imported species encountered in carving and joinery. Deal is light, stable, fast to carve and takes paint or gesso (a fine plaster bound with size used for gilding and paint finishes) better than oak.
Lime Tilia vulgaris Lime, with its ability to take detail, is the finest of all the carving woods. However, it lacks the stability needed for the structural elements of joinery and is slower to carve than pine. From the third quarter of the 17th century lime was used extensively for carved decoration on oak or deal joinery.
Walnut Juglans regia Walnut was used extensively for furniture in the first quarter of the 18th century and occasionally for joinery.
Mahogany Swietenia macrophylla From the second half of the 18th century mahogany from Central America was occasionally used for carved joinery. It looks good, works easily and is extremely stable. It may be hard to obtain suitable varieties to match early work.
TIMBER PROCESSING
Native hardwoods such as oak would be riven (split using wedges). Timber was then cut using a two-man saw with the tree trunk set on trestles or over a saw-pit with one sawyer above and one below the piece being sawn. Deal was machine sawn using water-powered sawmills before importation.
After seasoning, air-dried timber has a moisture content of about 17 per cent. The wood retains its ability to lose and regain moisture as the relative humidity in its environment varies. As it dries it shrinks or ‘moves’. The greatest shrinkage takes place along the circumference of the annular growth rings of the tree. The thickness of the rings is slightly reduced and the length of the timber along the grain moves very little. This differential shrinkage is the source of cupping and bowing in timber. The traditional way to minimise these problems is to ‘quarter-saw’ the timber to create even shrinkage within the plank.
REPAIR MATERIALS
Timber selection
When choosing timber for a repair it is
important to try to match the species of wood,
the moisture content, the grain width and the
grain direction. This matching will make the
repair look less obvious and will ensure the
minimum of differential movement between
the repair and the original piece. If replacing
an entire component it is best to select timber
as near quarter-sawn as possible, and essential
to reject any timber which has hairline cracks
and compression shakes, sap wood and large
or dead knots.
Glue selection
If the relative humidity in the room is within
reasonable limits and good contact surfaces
have been achieved, a traditional protein glue
such as pearl glue will prove as strong as any
modern alternative and is easily reversible. It
should be considered before other options.
Fresh glue should be made regularly in small
batches and should be heated in a traditional
glue pot. If the glue is old or if it is overheated
the collagen links on which its strength
depends will break down. Microballoons (a
lightweight filler) can be added to improve the
glue’s gap-filling properties but will cause a
small reduction in strength.
Epoxy resins give a strong bond and can prove useful if gap-filling properties are required. In some cases there may be a trade-off between poor reversibility and the need to avoid the loss of original material at the glued joint. A small amount of pigment can be added to colour the glue line to match the object. Quick-setting epoxy resins can prove useful in a situation where effective clamping can only be achieved by hand.
Fish glue and liquid protein glues applied cold are reversible and convenient but are not reliable unless environmental conditions are good.
PVA is only semi-reversible in practice, has poor gap-filling properties and should not be used if a joint is under shearing pressure as the glue line may creep. An aliphatic resin (a common constituent of wood glue which is more rigid than PVA) is a better alternative.
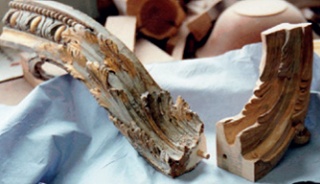
 |
 |
| Carving repair on an early 16th-century dais screen | 15th-century screen showing constructional layers |
TYPICAL DEFECTS AND CAUSES OF DAMAGE
Damp
The greatest enemy of carved joinery is damp
due to poor building maintenance. Damp can
lead to decay by wet rot, dry rot and insects
such as woodworm. It can cause the warping
of timber and the failure of protein glues.
Damp may still be a problem in some historic
buildings and should be addressed by a good
building maintenance programme, before
attempting other conservation work.
Low relative humidity
In many historic buildings today, better
maintenance and central heating mean that low
relative humidity is a very common problem.
This leads to cracking and warping, loose joints
and desiccation of glue. A relative humidity of
between 40 and 65 per cent is best, and ideally
the temperature should be no more than seven
degrees above external conditions. However,
this is likely to prove unacceptably cold at times
for the occupants of the building. There are
several possible solutions to the problem. For
further information consult English Heritage’s
Environmental Management Performance
Standards (see Recommended Reading).
Lighting
Unsuitable lighting can result in an unhelpful
increase in temperature near a carving.
Sunlight and strong artificial lighting
can cause bleaching to timber or cause
deterioration of surface finishes. Fitting
a window film that provides ultraviolet
protection can be an effective solution.
 |
 |
| Epoxy microballoon fill and dowel, and (right) the two halves combined | |
People
Woodcarving is subject to depressingly
regular damage and loss at the hands of
cleaners or contractors working in historic
buildings. People are often unaware of its
vulnerability. A short induction and written
guidelines for contractors stressing the
historic value and fragility of the fittings will
go some way to addressing the problem where
access cannot be restricted.
Insect attack
Damage by wood boring insects such as
furniture beetle, house longhorn beetle or
deathwatch beetle can cause considerable
damage. The drier conditions found in most
buildings today are less attractive to these
insects but if new flight holes or the insects
themselves are spotted, seek advice promptly.
Poor original design
Damage can also be caused by a failure of
short grain (where the cut ends of the grain
are exposed) on pieces of timber under stress,
or fixings that do not allow for movement in
the timber.
TREATMENT OPTIONS
 |
|
| Carving replacement after consolidating charred area with Paraloid B72 | |
 |
|
| The use of unglued wooden biscuits to hold a two-piece spandrel panel in line while allowing movement |
Cleaning
The surface finishes on carved joinery vary
widely and it is unwise to assume the piece
retains its original finish. Early carving
that was originally painted and gilded may
have been stripped and treated with wax,
linseed oil, French polish or oil varnish. Test
cleaning and inspection under ultraviolet
light for variations in fluorescence can help
to identify varnish layers and components
such as natural resins and drying oils. Once
the identification of the surface to be cleaned
has been made and the remains of any earlier
schemes noted, it should be possible to
formulate a suitable cleaning method. If a
piece retains its original finish this should be
preserved with great care.
Consolidation
If the timber has suffered extensive insect
or fungal attack the careful injection of a
consolidant may re-establish the structural
integrity of the carving or impart enough
strength to allow the piece to be re-backed
with timber. Two-part low viscosity epoxy
will impart considerably more strength to
the object than solvent-based consolidants
and will be easier to apply effectively. The risk
of spillage onto the surface of the piece can
be reduced by filling any insect flight holes
with wax of an appropriate colour before
consolidation. Paraloid B72 can be useful for
surface consolidation. Conservators should
be realistic about the practical reversibility
of anything other than surface consolidation
whichever consolidant is chosen.
Fillers
Wax can be a useful filler for small cracks
and gaps in situations with unpredictable
relative humidity, where there may be the
potential for excess movement. In more
stable situations a narrow crack or joint
injected with glue then filled with wax may
sometimes be less visually obtrusive than
a colour-matched wooden fillet. Wax is an
ideal filler for insect flight holes. Good results
can be obtained using microcrystalline wax,
which is less sticky than beeswax and gives a
harder finish. The wax should be melted and
tinted with good quality oil colours to match
the colour of the surface to be filled. It can
be scored into thin strips and these can be
worked with the fingers until soft enough to
apply. It then can be levelled to the surface of
the work with a plastic scraper.
Epoxy filled with microballoons can be used in a situation where the surface of a badly decayed carving is intact and re-backing the piece with new timber is deemed impractical. This will not be reversible but it may strengthen the piece sufficiently to save it.
Re-backing
When a fragile carved object is structural it
may be possible to reinforce it by replacing
a badly decayed area on the back with new
timber leaving the appearance on the front
relatively unchanged. It may be necessary to
consolidate the piece before this is possible.
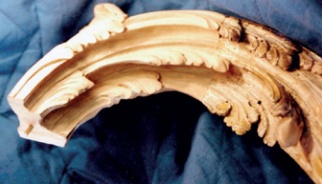
REPLACEMENT CARVING
Carving
 |
|
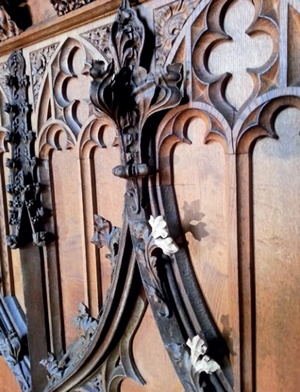
| Carving replacement New College Chapel, Oxford | |
 |
|
| Replacement 14th-century stiff-leaf at New College Chapel |
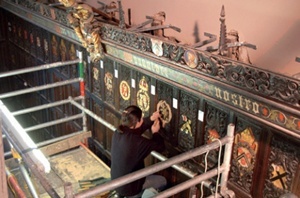
The most common type of intervention will involve replacing carved leafs and other small ornamental details. If the piece is part of a symmetrical scheme, a pattern can be taken from its mirror image. A small piece of clear plastic such as a CD case can be held over the surviving carving and the outline established with a fine marker pen. This can be instantly reversed and marked out on the new timber. A small band saw with a fine blade will prove invaluable for this sort of work. The outline can be cut on the band saw and then fixed to a small board with a hot glue gun or a paper joint. The board can then be clamped to the workbench and carving commenced. It is useful to have a photograph of the work being copied on the bench as an instant reference during the carving process. Once the carving of the front is complete, the carving can be removed from the board to allow the reverse to be carved back and any undercutting to be added. The final touches will take place after the piece is glued in position, taking great care to cut away from the original at all times. In some situations a carver may be working from photographs of the carving taken before the losses occurred. In these cases a working drawing will prove essential.
The most common type of intervention will involve replacing carved leafs and other small ornamental details. If the piece is part of a symmetrical scheme, a pattern can be taken from its mirror image. A small piece of clear plastic such as a CD case can be held over the surviving carving and the outline established with a fine marker pen. This can be instantly reversed and marked out on the new timber. A small band saw with a fine blade will prove invaluable for this sort of work. The outline can be cut on the band saw and then fixed to a small board with a hot glue gun or a paper joint. The board can then be clamped to the workbench and carving commenced. It is useful to have a photograph of the work being copied on the bench as an instant reference during the carving process. Once the carving of the front is complete, the carving can be removed from the board to allow the reverse to be carved back and any undercutting to be added. The final touches will take place after the piece is glued in position, taking great care to cut away from the original at all times. In some situations a carver may be working from photographs of the carving taken before the losses occurred. In these cases a working drawing will prove essential.
Fixing
The area where the new carving meets the
old should be left slightly oversize and any
extra wood needed to achieve the joint taken
into account. A clean flat surface needs to be
created on the piece being repaired. Often the
carving will have broken off along the grain.
If the timber is straight grained and of good
quality the break may well have a nearly flat
surface. If this is the case, a paring chisel can
be used to create a good surface with virtually
no loss of original wood. If more wood has to
be removed it is better to fit the repair to the
shape of the break. Carbon paper can be used
to mark high points which are removed in stages until the piece fits.
In some cases it will prove very difficult to get a perfect match in which case the use of a gap-filling glue such as an epoxy will create a better fix than a more reversible alternative. In some cases a mechanical fixing such as a small dowel or wooden biscuit will create a much more secure joint and will allow the repair to be removed and replaced during the carving process. For small repairs wooden kebab sticks are excellent for this purpose. Made of split cane with long fibres they are strong for their diameter. To mark the centres to be drilled, a pin can be taped across one of the pieces to be joined, with the pinhead where the dowel will centre. Pressing the two pieces together firmly will cause the sides of the pinhead to indent both pieces. The adhesive can be applied and the new carving clamped in position using spring clamps or masking tape.
~~~
Recommended Reading
V Dorge and F Carey Howlett, Painted Wood: History and Conservation, Getty Conservation Institute, Los Angeles, 1998
Environmental Management Performance Standards: Guidelines for Historic Buildings, English Heritage, Swindon, 2009
S Rivers and N Umney, Conservation of Furniture, Butterworth-Heinemann, Oxford, 2003
