
Cleaning and Restoring Fine Architectural Joinery
Vincent Reed
 |
|
 |
|
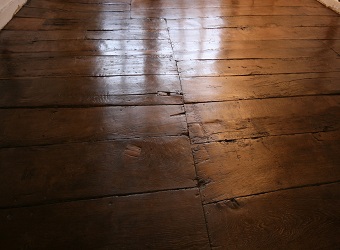
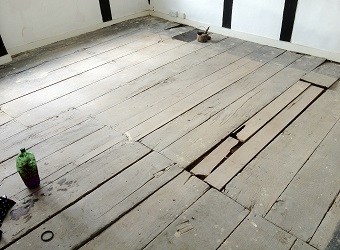
| 17th-century oak floor before restoration and after: no sanding was required (All photos: Vincent Reed |
Britain is famed for its historic buildings and boasts some of the finest examples of architectural joinery. However, there is a notable lack of understanding around the treatment of period interior woodwork, including the correct method of cleaning and the appropriate finish.
Conservators are often faced with the challenge of rectifying significant damage caused by misguided attempts to restore historic woodwork. The main causes are the misuse of modern sanding techniques and caustic chemical strippers which are designed to remove the surface as quickly as possible. Often their use results in a new surface which is devoid of character and stripped of any historic value. In the worst cases the client is left with an unsightly mess.
PRINCIPLES
If you are lucky enough to be the owner of a cherished and valuable piece of antique furniture, you might think twice about asking a local tradesperson to use a belt sander to refinish the surface. So why should this be any different for staircases, panelling, windows, doors or original timber floors? Whether finely carved and decorated as a focal point of beauty, or simpler products of artisan craftsmanship, these architectural features embody a moment in history and contribute to a building’s status and character. The only way to authentically conserve and restore traditional architectural joinery is to use traditional techniques.
A sympathetic approach to restoration is the key to responsible conservation, and conservation of the original patina and finish is the key to sympathetic restoration. This is not simply for aesthetic reasons. Patina gives a good indication of the age of the wood and is a significant aspect of its history, helping to tell the story of the whole building. Built up over centuries by human touch, natural wear and polishing, patina should be cherished not least because the wood often acquires a beautiful, warm sheen and feels silky to the touch.
Sympathetic restoration techniques, using traditional methods to reinstate the correct finish and to revive and wax wood are the best way to restore and clean joinery. This may be a painstaking process but the results speak for themselves.
It is often helpful to compare joinery with antiques. Imagine the year is 1700 and picture a new walnut chair of a dark, rich, reddish-brown colouring with intricate carved detailing. The chair sits to the side of a fire by a window. Over its lifetime it is used every day, dusted with a soft rag and perhaps waxed every few years. Today that same chair would be faded from exposure to sunlight, leaving beautiful soft honeyed hues with a slightly brown tinge from the fireside smoke. The carvings would be worn in places and the clean lines would be softened by an accumulation of centuries of dirt and wax. Dents from hob-nailed boots on the feet and rails would have left marks, darkened by builtup dirt and wax.
The presence of dents and scratches can be a promising sign that the original surface or finish has survived. The older these marks are, the darker their colour as a result of the buildup of dirt. These battle scars add a valued third dimension of texture and colour to a piece and set it apart from more recent or refinished examples. Even missing or broken sections of moulding or carved detail are prized over restored examples. The damaged area will have worn with age, allowing the valuable, sought-after patination to develop.
PATINATION TAKES PRECEDENCE
 |
||
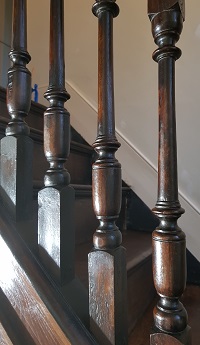
| A Georgian balustrade before and after reviving the original finish and waxing to retain its patina |
Although some are easier to remove than others, when removing any finish there is a risk that the original colour and underlying patination will be damaged or lost. For example, a shellac-based finish can be carefully lifted without damaging the original patina by using alcohol to gradually dissolve the shellac. However, an oil-based finish would require a harsher varnish remover. These tend to be aggressive, more difficult to control and can easily result in the loss of patina.
Where a modern finish has been applied, and the original finish and patina removed entirely, the only option is to strip the modern finish back to expose the bare wood and then to apply the most appropriate finish.
Ultimately, patination should always take precedence. If there is a risk of damaging the original patination, the existing finish should be conserved to protect the underlying character.
CLEANING
When cleaning back a surface using the correct method, a restorer can feel with their fingertips when they have achieved the surface from which to start to rebuild the finish.
The method described below, for cleaning back accumulated dirt using a reviver solution applied with soft cotton rags, is very sympathetic but requires a great deal of patience. The solution softens the surface of the dirt but leaves the underlying layers, which have built up and hardened over a longperiod of time, untouched. This hardened surface can then be waxed.
Step one: surface inspection
1) Look for any signs of alteration to the joinery item – for example, if any repairs have been made to an elevation of panelling. Be careful to inspect the whole item, not just where you intend to clean, because repairs in one location are sometimes disguised by over-polishing a large area.
2) Original finishes commonly have a deeper layer of surface grime. Note that this must not be confused with a stain.
3) Examine the surface carefully for evidence of marquetry or inlays which can be obscured by surface dirt.
Step two: reviving
1) Apply some furniture reviver to a soft white cotton cloth (such as an old white t-shirt with any buttons removed).
2) Gently work the reviver solution on a small area of the chosen surface using medium pressure in circular and straight
movements to remove the surface grime.
3) Keep working the solution into the surface using this technique, applying more solution if necessary for 15 minutes per square metre.
4) Before moving on to the next stage look at the cloth to see if the colour has changed (indicating that the surface grime is being removed).
5) With a new cloth, immediately wipe your surface dry with firm strokes, turning and folding your cloth to remove the dirt as effectively as possible. This will get physically harder as the solution is removed from the surface. Although it is hard work, this is the optimum moment to remove the dirt as more will stick to your cloth. Keep rubbing and buffing firmly until the action becomes easier.
6) Using the same removal cloth, start buffing and polishing the surface. Even though the cloth may be damp it will still be working.
7) Use a new cloth to finish buffing and polishing.
Step three: waxing
1) Apply a small, even amount of microcrystalline wax using a soft cloth.
2) Allow a few hours to dry then buff using a soft old-fashioned boot brush.
3) Buff with a cloth.
REMEDIAL TREATMENT OF DAMAGED SURFACES
The right approach to treating a damaged surface and restoring an original finish will depend on the individual project but here are some general guidelines.
Stop sanding!
There is a common misconception that wood needs to be sanded back to create a smooth surface for a finish to be applied. In reality, this abrasive treatment may save time but it will also cause irreversible damage. Sanding destroys the grain, removing the colour and distinctive appearance of the wood, and erases the priceless patination. Original tooling or historic marks, carvings and decorative mouldings are eroded, and the result is a flat, lifeless finish devoid of character that will be rough to the touch. This is the most common mistake made when restoring original flooring and panelling today.
Solvent and non-toxic varnish removers should only be used selectively. These strippers are very aggressive so application requires a great deal of expertise to gradually dissolve the surface finish. As with sanding, the risk is that too many layers are removed, creating a raw, unsightly and irreversible result.
Go with the grain
Deciding precisely how much of the original finish you should remove requires expert judgement. A qualified and experienced restorer can ascertain how much of the surface finish should be removed and how this can be achieved with minimal intervention, revealing the original finish while avoiding damage to the underlying patina.
Once the surface of the wood has been cleaned back, the finish can then be reinstated. A detailed knowledge of architectural styles is imperative when determining the appropriate finish to ensure it is in keeping with the period of the feature itself, as well as the building. For example, expensive quarter-sawn oak panelling would usually have had a clear finish to showcase the beauty of the grain and the medullary rays in the wood, denoting the status of a room. In comparison, any softwood features, such as pine panelling, doors and floors, would have been located in less significant areas of the home and would have had a pigmented or painted finish to hide the inferior grain.
Revival of the finish
If the surface has the original finish, cleaning gently by hand is always the best option. This requires mixing a traditional
reviver solution which includes linseed oil, methylated spirits, turpentine and distilled vinegar. This is applied using a cotton cloth and the weight of touch to remove the surface grime and reveal the underlying original finish. The surface is then waxed
by hand, using a variety of wax polishes to achieve a soft sheen and depth of colour.
What if only part of the original finish remains? In this instance, it is important to consider the historical significance of
the joinery. If it is a principal feature or of particular historical importance then the original finish should be reinstated. Where the original finish has been removed entirely, usually as a result of overcleaning, and the patina has been lost, the surface of the wood may need to be restored before the finish is reinstated. Experienced application of a complex combination of stains, polishes and coloured waxes can help to recreate the illusion of acquired patina in the form of ‘applied’ patina.
By using artisan craftsmanship and traditional materials and restoration techniques we can preserve the innate value of original joinery, prolonging the life of these unique architectural treasures.
Less is more
Maintenance should be minimal. The less you do, the more you will preserve. Dusting with a light cotton cloth as part of a cleaning routine and a light wax once a year will ensure that fine architectural joinery is conserved for years to come.