
Glass Painting Techniques in a Historical Context
Petri Anderson
 |
|
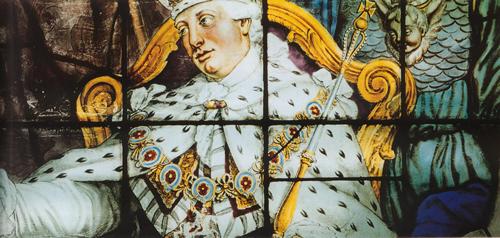
| Detail of Peckitt's Alma Mater window depicting King George III at the Wren Library, Trinity College, Cambridge |
Stained glass painting techniques have not changed dramatically since the
earliest known examples of the craft back in 9th century Germany. Today,
as then, the first stage is the production of a full size working drawing.
Using this drawing as a template, the glass is selected and cut, and each
piece of glass is individually painted using glass paint. The paint is then
fired into the surface by heating the glass to approximately 650° centigrade
in a furnace. When all of the glass has been painted it is assembled into
panels by bending 'H' section strips of lead around the pieces of glass
and soldering the strips together where they meet.
Broadly speaking this has been the process over the past ten centuries.
There have however, been several innovations, particularly in techniques
of glass painting, which have both enriched and added to the variety of
stained glass that can be appreciated today.
 |
|
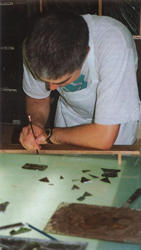
| A glass painter tracing on a light table |
Some of the techniques available in the medieval period were recorded by Theophilus, a 12th century German monk who was also a glass painter. He talked of the various metal oxides used in the production of different coloured glasses. He also detailed the production of 'flash' glass, a thin layer of coloured glass on top of a clear glass substrate, and described the process of removing areas of the thin coloured 'flash' using an abrasive wheel, which has the effect of achieving both a colour and white on a single piece of glass. These basic methods of production are still used today, although the flash is seldom abraded in the same way: modern techniques include etching with hydrofluoric acid and sand blasting. With parchment then a rare and valuable commodity, Theophilus and his contemporaries drew up their designs on whitewashed tables. As paper and parchment became more accessible this procedure was abandoned.
In medieval stained
glass manufacture, the design was painted directly onto the coloured glass
panes, adding monochrome detail to a coloured base. The colour of the paint
itself was dependent on the amount and type of oxide used in its production,
but was usually black or brown. Until the 14th century the paintwork seen
on glass was predominantly applied by brush, with some further working with
sticks, quills and stiff coarse brushes once the paint had dried. This is
sometimes referred to as the smear technique, and it produced quite coarse
results.
A 14th century development in glass painting technique was the use of the
badger hair brush. This is a broad brush (some modern badger hair brushes
are 5'' wide) which is used as a dry brush on wet paint to soften the paint
effect and remove application brush marks. Frequently the badger brush was
also used to achieve a 'stippled' paint effect by pouncing the wet paint.
This allowed the painter to achieve a more refined appearance. Another addition
to the glass painter's repertoire was 'silver stain'. In the early 14th
century it was discovered that applying a compound of silver onto the glass
and then firing it would stain the glass anything from a pale lemon colour
to a deep orange colour. This discovery revolutionised stained glass. Suddenly
there were lots of new possibilities: for the first time colour could be
applied to the glass and controlled depending on the firing temperature
and thickness of the application. While the paintwork was confined to the
side of the glass that faced inwards, the silver stain was applied to the
outside face of the glass.
 |
|
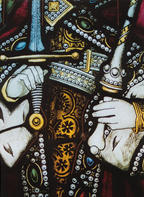
| Detail of some Kempe paintwork from one of the North aisle windows at All Saints Church, Leighton Buzzard |
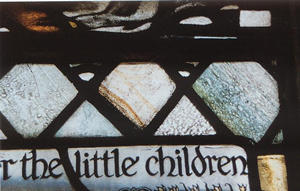
By the 16th century, enamels - coloured paints made from coloured metal
oxides, ground glass and a flux (usually lead oxide or borax), mixed with
water and gum arabic or lavender oil, and fired onto the surface of the
glass - were available to the glass painter. With such a large number of
colours now possible on a single piece of glass, a trend developed to produce
large windows using rectangular pieces of glass that had been painted, stained
and enamelled (see main illustration at top of page). No longer was the designer bound by the strict constraints
of leading off each and every piece of glass of a different colour. This
trend endured until the early 19th century. Two artists who grew to prominence
in this period were the van Linge brothers, Abraham and Bernard. Abraham
tended to work the paint quite vigorously for dramatic effect, whereas Bernard
had a slightly softer approach to glass painting.
As the 19th century progressed there was a revival of interest in the gothic
arts and the majority of designers reverted to the medieval techniques of
producing mosaic stained glass, leading off separate colours. Different
paint techniques and effects were employed within these various design styles,
and were generally reliant on the media with which the paint was mixed.
Historically the liquids that hold the glass paint in suspension cannot
always be accurately determined, but from the styles of painting some educated
guesses can be made about the carrying liquids used.
Traditionally, the first stage in the painting process is to paint on the line work. This is done using a thick paint mixture. The painter will lay the glass over the working drawing and trace the line work onto the glass. Very often the traced paintwork will be left to dry thoroughly for a day or so and then other layers of paint will be laid over this line work and so the painting is built up. In this procedure, it is necessary to add a fixative to the paint to prevent it from lifting or smudging when the successive layers of paint are applied. Common additions for this purpose are gum arabic, vinegar and sugar. Vinegar is particularly effective and holds the trace line very well and it also aids the flow of paint from the brush to the glass, allowing for some delicate tracing. If the glass painter was reluctant to risk the trace line being adversely affected by paint laid on top of it, he could kiln fire the trace line before any further painting.
|
|
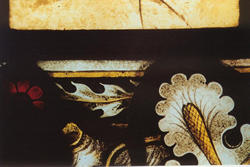
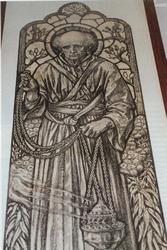
| Detail of some Clayton & Bell paintwork from the Chapel Studio collection |
The successive layers of paint (known as matting paint) are usually mixed in a water and gum arabic medium. Varying the amount of gum allows differing effects to be achieved. Kempe,
for example, would apply quite a dense layer of matting paint over all of the glass, then use the badger brush to give the paint a heavy stipple. This would then be worked using hog's hair brushes and needles to remove paint from the highlighted areas.
Frequently the needles would not only remove the matting paint but also scratch into the trace paint, giving a lot of contrast to the artwork and producing a crisp effect. In contrast, John Hall & Sons would use a slightly tighter stipple and their glass painters employed minimal use of hog's hair brushes when painting heads, hands and feet. Instead they would predominantly use needles to laboriously remove the paint where it wasn't wanted. This gave very precise effects on the flesh tones. When they came to paint the drapery, however, they would almost exclusively use the hog's hair brushes.
 | ||
| Detail of Christopher Whall's paintwork from the tower window, Church of the Holy Cross, Sarrat |
In several of the Victorian studios, glass painters used their hands to rub the stippled paint after it had dried so that the paint began to loosen and pores opened up on the paint surface. This loosened paint was then worked with hog's hair brushes. Varying the weight of paint, the gum content and the coarseness of the stipple would all have varying effects on the size of the pores that developed under the pressure of the hand rub.
Many Clayton & Bell windows were characterised by a delicate, controlled opening up of the paint under hand pressure, an effect achieved by using a wet loose stipple, medium weight of paint and medium/heavy gum composition. To increase and deepen the soft dappled effect the same matting process was done on the back of the glass. In contrast, many painters of the Arts and Crafts movement such as Christopher Whall and Carl Parsons would use a denser matting paint with a heavier gum content. This was then rubbed vigorously to create pronounced textures in the paint, which were then further worked using hog's hair brushes, quills and needles. This paint style, combined with the rich antique glasses used in the Arts and Crafts period, resulted in some very free, expressive and at times dramatic stained glass. To convey the desired effect to the glass painter these designers tended to draw up their full sized cartoons (working drawings) on textured cartridge paper using charcoal which gave some similar effects to the paint style.
|
| Carl Parsons' cartoon from the Chapel Studio collection |
Many of the Victorian
studios would not restrict themselves to just one trace paint and one
layer of matting paint. Sometimes they used a vinegar trace overlaid with
two water and gum arabic matts (the second matt just starting to lift
and blend with the first matt) and then a lavender oil matt laid over
the top of the two water matts. Few glass painters employ such a bold
and confident attitude to glass painting these days, and with modern kiln
technology and relatively rapid firing times consider it safer and more
expedient to fire the glass at the various in-between stages.