
Can Masonry Cleaning Ever Be Considered Truly Safe?
Jamie Fairchild
 |
||
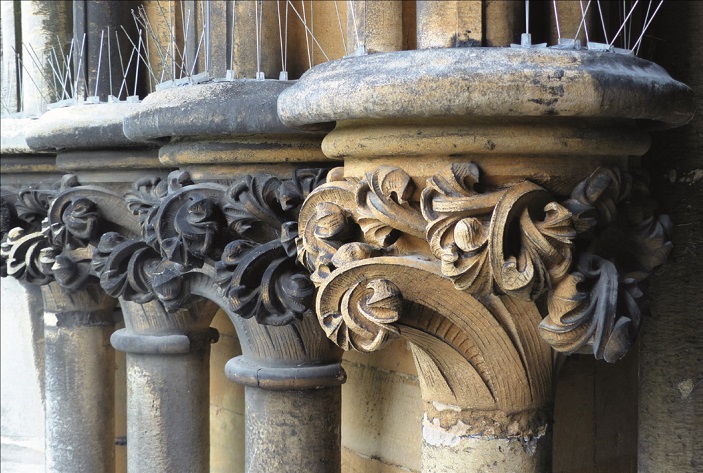
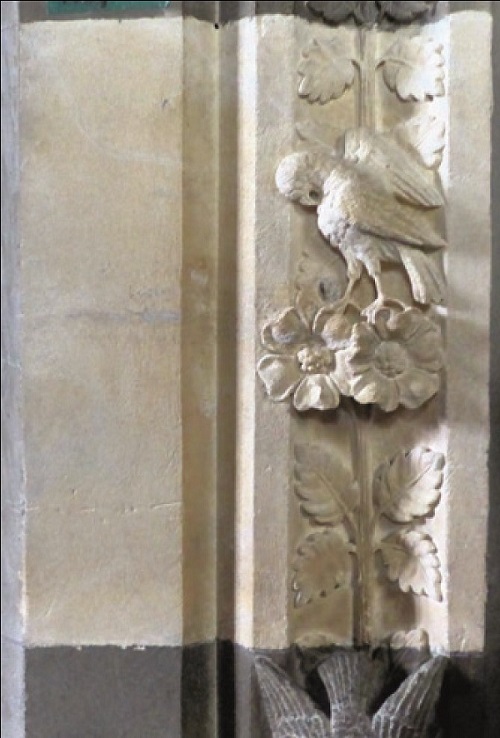
| A cleaned limestone capital demonstrates an agreed cleaning method (wet air abrasive) method and level of clean. (Photo: Restorative Techniques Ltd) |
When considering the safety of road travel, the risks involved might appear straightforward to quantify; we could examine the statistics for serious injuries sustained per kilometre of a particular road and compare this with other routes. However, perhaps we should include minor injuries in our calculations or compare the risk of travelling our chosen route with that of staying at home?
Likewise, where the safety of masonry cleaning is concerned, will cleaning inflict more damage than leaving the soiling or coating in situ and how do we define successful cleaning? The reality is that the outcome is difficult to quantify and safety is most often relative rather than absolute. Instead we concentrate on minimising risk, managing expectations and paying close attention to the factors within our control – the cleaning equivalent of passing a driving test, maintaining a safe vehicle, adopting a recommended route and keeping within the speed limit. Firstly however, is the journey, the process of cleaning, actually necessary?
REASONS FOR CLEANING
In general, the primary motives for cleaning are aesthetic and hygienic. For buildings, particularly historic structures, we might have additional or alternative objectives. The following are the principal technical reasons for cleaning:
- remove soiling or coatings harmful to the masonry
- reveal defects and facilitate a condition survey
- enable repair, repointing or redecoration
- preparation for additional treatments
- remove toxic residue or coatings
- improve legibility and facilitate recording
- enhance the historical significance
- increase light reflection for visibility and safety
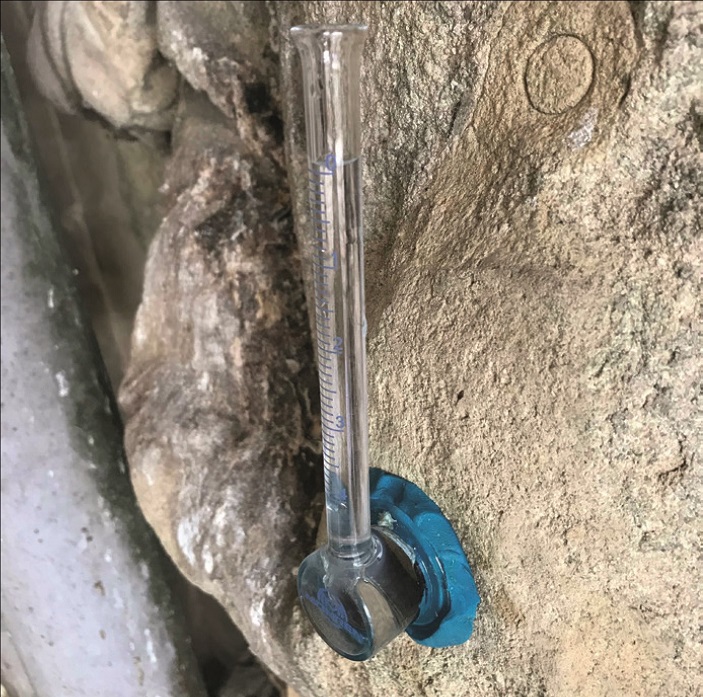
A Karsten tube being used to determine the change of porosity before and after cleaning. (Photo: Odgers Conservation)
The following are broadly aesthetic or commercial aims:
- harmonise existing and repaired masonry
- engender social wellbeing, pride or respect
- remove disfigurements caused by a traumatic event
- fulfil the requirements of a lease
- demonstrate project expenditure
- increase commercial value
The presence of significant dirt is normally regarded as a sign of neglect. Even so, the cleaning of a listed building for aesthetic appearance is generally given a low priority by those providing consent. Quite rightly we will be asked to justify the need, the method used and the degree of cleaning. The reasons for this include the perceived risk of physical damage and potential loss of historical patina. It is likely that any cleaning, however gentle, will result in some surface loss even if not readily visible to the eye. Nonetheless, thoughtful cleaning will mitigate the effect of soiling decay mechanisms and promote reuse of a neglected building. The balance of risks and benefits must therefore be considered for the long term (decades), not just before and after cleaning.
PRE-CLEANING INVESTIGATION AND ASSESSMENT
Firstly it is necessary to identify the masonry type and the soiling or coating adhered. In a straightforward case, experience alone may determine this correctly, perhaps with the aid of a x4-10 magnifier or USB microscope. In the laboratory, chemical analysis can determine soiling or coating constituents and thin section petrographic and paint microscopy is used to identify stone and paint types. XRF (x-ray fluorescence) equipment can be operated on site or in the laboratory to determine the precise elemental composition of almost any substrate or substance. Archival research may identify the age and source of the masonry and helps to establish its relative significance in heritage terms.
Cleaning can be one of the most dramatic aesthetic alterations we make to a building, and great care should be invested in considering and undertaking the process. This will involve answering a significant number of questions honestly. A few examples:
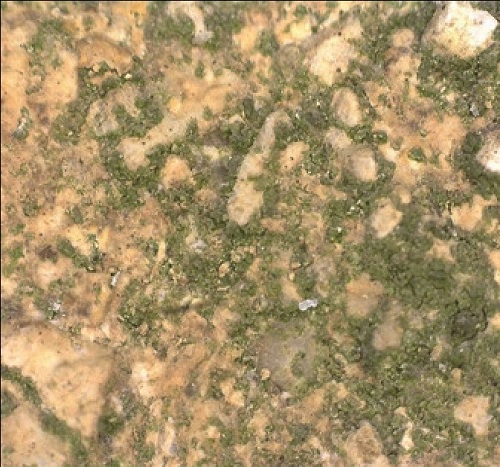 |
||
| A micrograph made with a USB microscope at x50 magnification showing a partially cleaned surface with residual algae. (Photo: Odgers Conservation) |
- Is there an overwhelming need to clean?
- How large is the area, and in what timescale must it be completed?
- Do we need to clean the whole structure?
- Will the clean be durable?
- Are there worktime restrictions – for example, high or low ambient temperature or noise – and at what
stage of the project (before or after repair and repointing) can we clean? - Is there vulnerable adjacent or internal fabric that requires protection?
- Can we confine the process and prevent egress of water, dust, chemical residue?
- Is the masonry due to receive a coating or other treatment after cleaning?
- Will the finished project be subject to periodic inspection and a maintenance programme?
An effective way of reducing risk is to limit the anticipated degree of cleaning or paint removal. It could be said that 90 per cent of the risk is in removing the last ten per cent of the soiling or coating – highly unscientific but the principle is sound.
SUBSTRATES, SOILING AND CLEANING GUIDANCE
The principal published guidance for masonry cleaning is BS8221-1:2012 Code of practice for cleaning and surface repair of buildings – Part 1: Cleaning of natural stone, brick, terracotta and concrete. This provides a shortlist of the most common categories of masonry substrate; stone, clay and calcium silicate brickwork, terracotta faïence and concrete but not specifically render, plaster or cob. Each substrate description also contains advice as to which cleaning methods might be suitable, or indeed unsuitable. A list of specific deposits details their characteristics and how they might be removed.
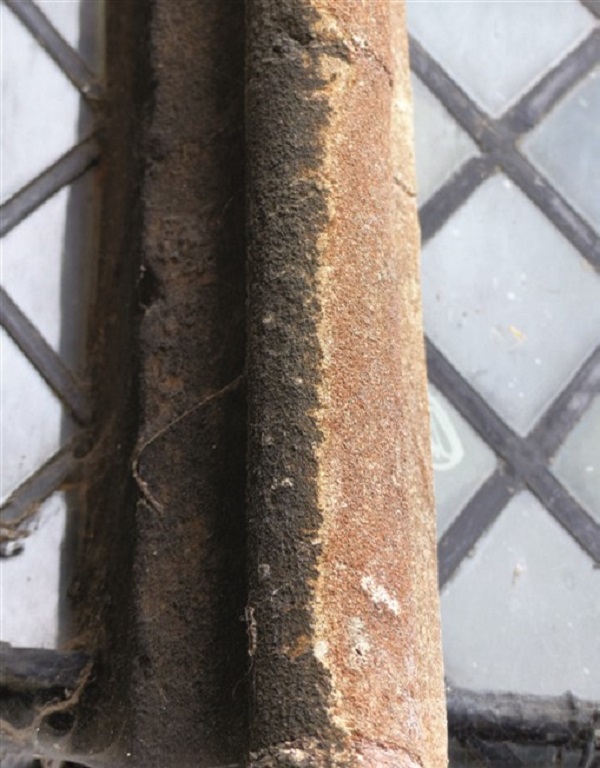 |
||
| A limestone mullion with red algae on the weather face and a thick sulphation crust on the sheltered face: both pose a threat to the integrity of the surface which may justify cleaning. (Photo: Restorative Techniques Ltd) |
In broad terms, the techniques and precautions for cleaning un-weathered concrete are similar to those for limestone while those for brick and terracotta (excluding faïence) are akin to those for fine grained siliceous sandstone. Natural stones are subdivided geologically into three categories; igneous (principally granite and basalt), metamorphic (marble, slate and quartzite) and sedimentary (limestone, sandstone and alabaster). Their properties (grain size, weather resistance, porosity, hardness, water and chemical solubility) vary considerably and in turn affect their vulnerability. The broad determinant for the success of removal is whether the soiling or discolouration is on the surface or sub-surface, the latter being more difficult to remove.
Calcareous substrates (limestone, marble, calcareous sandstone, concrete, lime render and pointing mortar) are particularly susceptible to pollution. In damp conditions acidic sulphurous gases convert the constituent calcium carbonate to calcium sulphate. This sulphate binds carbon soot and other airborne pollution particulates to the stone, forming a film of black carbon sulphation often referred to as a gypsum crust. Apart from being disfiguring, this can contribute to salt entrapment within the stone, although when exposed to sufficient rain the semi-soluble sulphate is rinsed away. Similarly, during cleaning the sulphate can be deliberately washed away, the process accelerated by regular brushing. Alternatively the sulphate deposition can be reversed by using a relatively mild poultice of ammonium carbonate, or abraded preferentially from the stone by the wet air-abrasive method. A number of effective options are therefore available for sulphate removal.
The bond of carbon and hydrocarbons with siliceous substrates (those bound with silica – sandstones, grit stones and porous brickwork) is usually very strong. Separation normally requires correspondingly strong alkali-acid treatment or mechanical abrasion. For these reasons limestones are generally much easier to clean than sandstones, and calcareous sandstones (bound with lime) easier to clean than siliceous sandstones.
Siliceous sandstones tend have a more open pore structure than other stone types and may darken naturally with exposure to the elements but are also vulnerable to the absorption and retention of cleaning reagents. Iron-rich minerals within the stone are subjected to colour change or mineral loss, causing either colour enrichment, bleaching or efflorescence. Surface residue can normally be removed sympathetically from sandstone but subsurface discolouration should be interpreted as patination in order to avoid the use of more invasive cleaning methods.
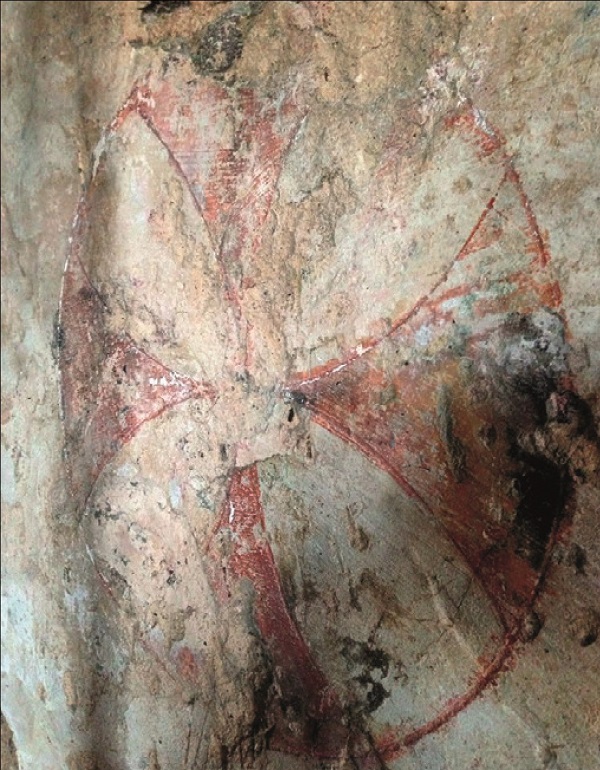 |
||
| A painted consecration mark is revealed after the removal of paint and graffiti layers. (Photo: SMB Restoration Ltd) |
Salts (principally sulphates, nitrates and chlorides) may occur naturally within stone and brick or may be introduced inadvertently from mortar, adjacent soil, bird guano, de-icing salt, cleaning chemicals, and airborne pollution. Quaternary ammonium salts are used as algaecides but other salts can be created when neutralising acid and alkali cleaning reagents. We’ve described one reaction where pollutant gases generate calcium sulphate at or close to the surface, however soluble salts may also be transported from deep within masonry, drawn by capillary action to the evaporation front. On reaching the surface these salts can wash away naturally with rainwater, but in sheltered or interior locations form visible efflorescence. Confined and exposed to cyclical changes (principally wetting and drying), salts may crystallise within the pore structure of the stone leading to disaggregation and spalling. Therefore the removal of salts (desalination) and overlying lime and sulphate encrustation is normally beneficial.
Soluble efflorescence is perhaps best removed by simple brushing and collection. Close sub-surface salts will require repeated application of a plain poultice or, if the salts are insoluble (including corroded metal staining), a chemically activated poultice may be required. Drawing and exhausting the reservoir of salts from deep within stone is difficult to achieve and rarely successful.
White deposits observed on masonry are routinely referred to as salt efflorescence but are more commonly comprised of calcium or magnesium carbonates, the presence of which may be disfiguring but are comparatively benign. If salts are suspected then it is best that samples are tested in the laboratory before deciding a course of action.
Organic growths include algae, cyanobacteria, fungi, lichen, moss, liverworts and rooted plants. The first in our list are the first to colonise a clean surface, unlocking nutrients and creating the conditions required by the higher growths. In general, organic films and growths reduce porosity and increase moisture in masonry. The excretions (principally oxalic acid) of some of these growths can dissolve calcareous stone and chelate metallic minerals but paradoxically the calcium oxalate deposited may act as a natural shelter-coat. Algae and cyanobacteria are relatively easy to remove while fungi and lichens are more tenacious. In context, these may significantly add or subtract from the aesthetic appearance of a building or memorial, and rare lichens or plants may be legally protected.
CLEANING METHODS
There is a very wide variety of methods available, but we can place the majority within three broad categories. We can add a fourth; radiation (principally laser) methods. In practice there is a considerable overlap as most chemicals used are of aqueous composition and rinsed with water. Abrasive methods for example are frequently used with water to gain the advantages of softening and dust suppression.
Water based methods
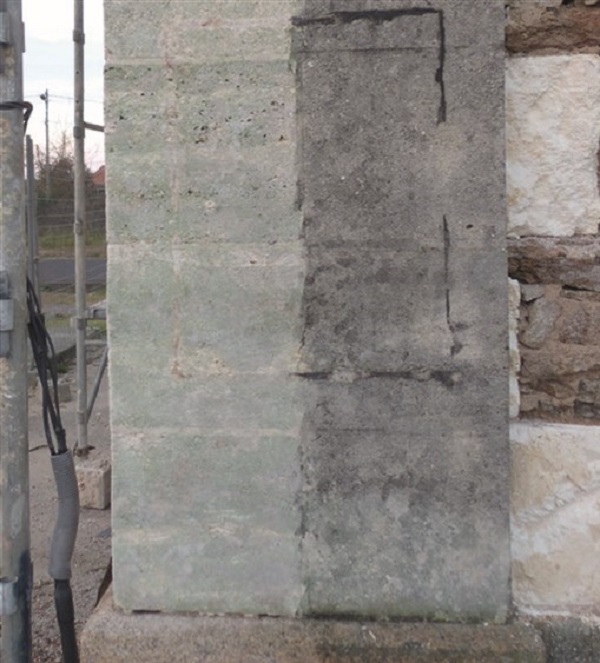 |
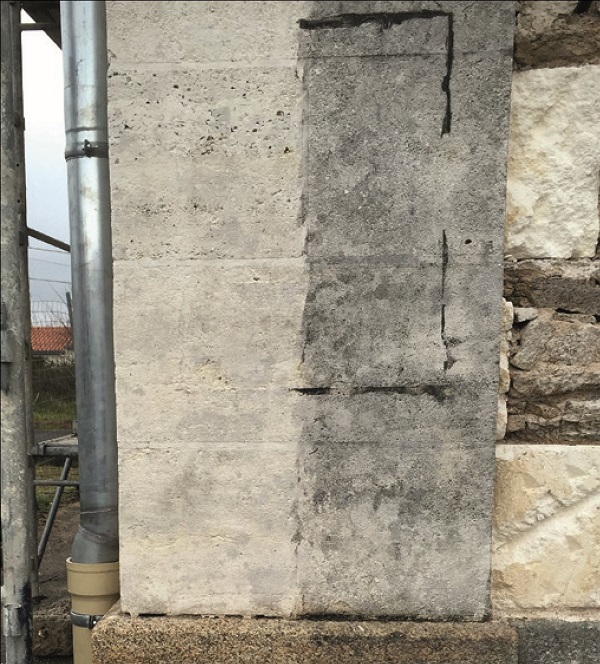 |
| Test cleaning of a limestone pediment to remove mastic and algae using a superheated water system: left, after 30 mins (Photo: Restorative Techniques Ltd), and right, after four weeks (Photo: Anthony Joubert SLP). Sufficient time must elapse before the success or failure of the cleaning method can be correctly determined. | |
- atomiser hand-spray bottle
- intermittent nebulous spray
- dry steam
- cold pressure water
- hot pressure washer
- superheated water system
Chemical based methods
- acid, alkali, detergent, algaecide, chelating agent, enzyme or other active chemistry
- aqueous or organic solvent composition
- liquid, gel, latex or poultice consistency
Mechanical methods
- hand brushing
- hand held fibre scourers
- hand held abrasive blocks
- hand held scalpel or scraper
- dry micro air abrasive
- wet/dry swirl air abrasive
- venturi wet abrasive
- wet/dry air abrasive blasting
Equipment must be safe, portable and readily adjustable. The cleaning operative must have the requisite skill and experience with the reagents, tools and equipment used and, most importantly, a familiarity and empathy with the substrate. Preference is given to those methods least likely to generate salts or retain residues. For building façades, a reasonable ambition is that the method does not remove sound surface visible to the eye. Throughout the cleaning works ensure good communication, supervision and recording – inspect the work regularly. Formalise the acceptability of each stage of the work.
TRIAL CLEANING
 |
||
| A test panel showing the effects of using the latex method for the removal of soot following fire-damage. (Photo: Restorative Techniques Ltd) |
The most important tool for the evaluation of cleaning methods is to undertake trials. These are normally carried out at two stages.
Pre contract trials should be undertaken at the earliest opportunity, well before the main works and in discreet locations representative of the substrate, soiling and detail. The aim is to demonstrate the suitability (or not) of each method and to determine the speed and cost of the operation. All of the key decision makers (client, architect/surveyor, conservation officer and others) should be present during the trials so that the options are understood, acceptable parameters demonstrated and exemplar panels agreed. It is important to record and disseminate the pertinent test information for each panel, including before and after photographs, the location, ambient conditions and operating parameters selected.
Contract trials aim to demonstrate the ability of the contractor to replicate the exemplar panels using additional test panel locations. Acceptable panels should be witnessed by the client’s representative and formally adopted as control panels for the duration of the cleaning work.
It is important that the cleaning operative is briefed beforehand as to suitable locations for test panels and the level of cleaning anticipated by the interested parties. Locations are sometimes chosen deliberately to target masonry which is due to be replaced or covered up, but it is important that the test areas are representative of those being retained. The size and location of the test panels should be indicated on a plan or photograph or directly on the substrate with temporary marker (crayon, chalk or tape) and a unique letter or number retained beside each.
In the case of a listed building the final
arbiter is likely to be a conservation officer
and so it is most important to understand
their wishes and expectations. The acceptable degree of cleaning may be a matter of
negotiation, but the final decision is most often
guided by the test panels.
It is usually much more important to achieve an even result rather than the brightest clean, and understanding the degree to which this is possible is often only determined during the trials. Leaving it up to the cleaning contractor or operative to determine the appropriate level of clean is rather like expecting a painter or decorator themselves to choose a paint scheme. Do not be surprised if their choice is not what was wished for.
Further Information
- British Standard BS8221-1:2012 Code of practice for cleaning and surface repair of buildings – Part 1: Cleaning of natural stone, brick, terracotta and concrete, 2012
- English Heritage, Practical Building Conservation: Stone, Ashgate, Farnham, 2012
- English Heritage, Practical Building Conservation: Concrete, Ashgate, Farnham, 2012
- J Fairchild, ‘Abrasive Cleaning Methods for Masonry’, The Building Conservation Directory 2016
- Siegfried and Snethlage, Stone in Architecture, Springer, Verlag-Heidelberg-Berlin, 2011
- Archive of cleaning articles: www.buildingconservation.com/articles/articles.htm#cleaning