
Sash Windows
Painting and Draught-Proofing
David Wrightson
 |
 |
|
| Right: a well-painted window, showing reasonable overpainting of the glass. On the left, a similar example, but here the painter did not understand the difference between the frame and the sash: there is an arbitrary line across the top of the muntins (which are in the same plane as the other outer linings). He has also not returned the frame colour round the lining returns, which has resulted in a slightly insubstantial appearance. | ||
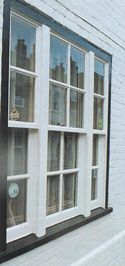
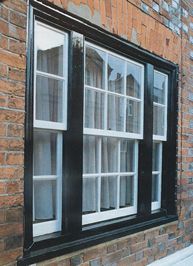
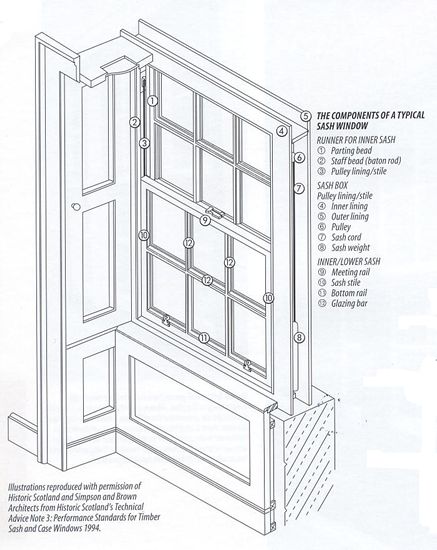
The sliding sash window has been with us for over three centuries and the operating principle has remained almost unchanged throughout that time. Some of the components, such as the staff bead and the parting bead can still be bought off the shelf.
Sash windows are made in such a way that they can be easily dismantled for repair or for replacing broken sash cords. Many people fail to realise this when they encounter problems and think that the only sensible option is replacement – sometimes with modern plastic windows – which is simply not the case. Some timber windows have lasted for centuries because they have been properly maintained and painted regularly. Plastic windows (PVCu) by comparison, cannot be dismantled and repaired so easily, and the components cannot be made by any competent joiner. They have not been tested by time and there are already signs of failure. Plastic windows, which usually come with double glazed scaled units are generally only guaranteed for ten years and are expensive to replace if they fail. Furthermore, they are constructed in such a way that they cannot reproduce the mouldings and details characteristic of traditional timber windows. Almost without a single exception, plastic windows are completely unsuitable for use in any historic context.
The problems most likely to be encountered with traditional timber sashes are sticking, failure of joints, failure of putty, wet rot, rattling, and draughts. The first four of these are the result of poor maintenance and the lack of a good protective coat of paint. Rattling and draughts can be dealt with in a number of ways, which we will examine later.
MAINTENANCE
You should aim to inspect your windows every year (and, ideally, get a qualified professional to inspect the whole house every four or five years). Typical sash window problems likely to be encountered include:
- Cracked and flaking paintwork: the outside of the windows should be repainted at intervals of five to eight years, normally.
- Sticking windows: usually the result of either careless replacement of staff bead, following repair or re-cording, which is easily remedied, or a build up of paint which needs to be removed.
- Failed putty and broken glass panes: these are relatively easy to replace.
- Broken cords: in former times people re-corded their own windows - the cords and sash weights were available at any ironmongers (and still are at some).
- Timber decay, particularly to the bottom rail: fillers are invaluable for minor decay and surface imperfections where the strength of the timber is unaffected; loose corner joints can be strengthened by means of corner brackets which can then be painted over; and more significant repairs can be carried out by any competent joiner.
PAINTING
Preparation
Carry out any repairs, rot treatment, re-glazing or re-cording. Remove all sash furniture (window fasteners and sash lifts or handles). Wash down the previous paintwork with sugar soap, soda or detergent, and rinse off. Rub down with pumice stone, pumice block or sandpaper and brush away all dirt and grit. If your windows were painted with a lead based paint, you must use a wet or damp process to prevent the release of toxic dust into the air. Use a hot air paint stripper only if necessary (if a build up of paint is causing sticking or completely obscuring mouldings). Protect glass by using a suitable shield. Use a shaped shavehook to strip mouldings. A respirator should be worn when burning off old lead paint, because of the toxic fumes. Never use a blowlamp or propane torch; they have been responsible for too many fires in the past. Next, spot prime any areas of exposed bare wood. (If you have taken out the sashes for repair or re-cording you will notice the edges of the stiles are unpainted, leave them this way; that's how they're meant to be).
Paints and equipment
Provide yourself with a safe ladder, protective dustsheets, appropriately sized brushes, a paint kettle, and the correct type of paint. In most cases you will find it easiest to use a one-inch brush for the glazing bars, and a larger brush for the other areas (professionals tend to use the largest brush they can in any given circumstances, but this requires experience).
 |
A paint kettle holds a manageable amount of paint at a time, is easy to hold, and helps prevent grit from dirty brushes getting back into the paint tin. The correct type of paint depends on what you are painting onto. Some paints are not compatible with others, especially earlier paints, and can fail quite rapidly. The make up of modern paints has changed so much that you will need the advice of a reliable supplier. Unless the chosen paint is thixotropic (a thickish gel usually marketed as a single-coat paint) make sure you stir it well, since the various constituents quickly separate out during storage, and the solid pigment goes to the bottom of the tin. Don't paint in very hot or in very cold weather; painting outside in wet weather is not advisable).
Glazing bars
Some people find these difficult to paint and rely on proprietary masking devices or on masking tape. It is much better to learn how to do it properly, using a brush of the right size. Try to develop a technique that allows you to just cover the junction between the glass and the putty. This prevents water from getting in and stops the putty from deteriorating. If you accidentally paint onto the glass this can be cleaned up later using a special scraper. Some painters will overdo this principle and paint (very neatly) much too far onto the glass. Try to avoid this, as it increases the visual weight of the glazing bars often in an inappropriate way. (Broadly speaking the width of the glazing bars gives an instant clue as to the period of a building).
Procedure for internal painting
1. Slide the outer sash down a little and raise the inner sash slightly, leaving a gap top and bottom.
2. Paint the glazing bars and the surfaces of the inner sash including the top surface of the meeting rail and the underside of the bottom rail.
3. Then paint what you can see of the outer sash, including the face (but not the underside) of the meeting rail.
4. Now slide the outer sash up, but not quite closed, and lower the inner sash by gripping it from the outside so that you don't touch the wet paint.
5. You can now complete the painting of the outer sash, omitting the top surface of the top rail. Ideally you should leave the sashes in this position until dry.
6. According to how your colour scheme relates to the outside paint colour, you can either paint the pulley stile at the same time as the sashes, or later. If painting at the same time, then the stile, parting bead and staff bead can be painted in sections as the sashes are moved up and down. Pull the sash cords out when you are working behind them (painting the cords makes them more likely to break); paint the pulley housing but not the pulley itself, otherwise it will jam and the sashes will not run easily.
7. Finish off by painting any inside linings, frames, and shutters. Tackle one component at a time if possible, and complete it before moving on to the next. Any framed elements such a shutters or lining should be covered in the following order; mouldings and panels (at the same time), muntins, top rail, middle rail, bottom rail, and stiles. Remember to 'lay off' (the final brush strokes) in the same direction as the grain of the wood.
Procedure for external painting
1. Reverse the sashes as described above and paint all visible surfaces except the top surface of the top rail of the inside sash. The pulley stiles can be painted at this time also.
2. Return the sashes to an almost closed position and complete the painting of the inner sash and the pulley stiles, together with the cill.
When finished, all exposed wood should be covered; any unprotected wood can be affected by moisture, providing entry points for rot and allowing unwanted expansion with consequent sticking of the sashes. At the same time, the coating of paint should not be so thick as to cause its own problems, jamming the sashes in their runners, or preventing them from moving at all.
 |
 |
 |
|
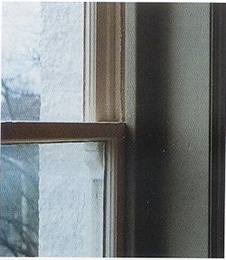
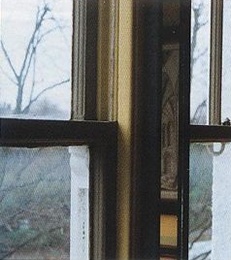
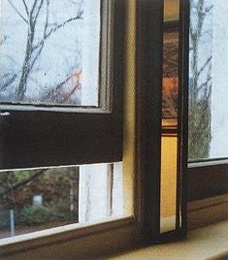
| On
this window the inside colour stops at the staff bead and the runners
are both white,
which is the outside colour of the windows. |
As the internal frame and the sashes are different colours the upper half of the inner runner of this sash window has been painted the same light colour as the frame. The lower half of the outside runner is the same as the outside colour of the window (white). | ||
Paint colours
The question of where colours should finish often arises, particularly when dealing with the runners (the inner faces of the staff bead and parting bead that the sash stile runs between). There are no hard and fast rules, but the problem becomes acute when sharply contrasting colours are in use. A certain amount of judgement is called for, but generally it is simplest if the runners are the same colour as the sashes, although it is sometimes the case that inner and outer runners are different colours. To complicate matters further, the upper and lower halves of the inner runners can be different (see photographs). Don't forget that outside painting in a new colour may need listed building approval if it significantly alters the character and appearance of the building.
DRAUGHT-PROOFING AND WEATHER-STRIPPING
Take any combination of the words draught/ weather and proofing/stripping/sealing – they all mean exactly the same thing: anything done to reduce air leakage. More heat is lost in this way than can be saved by trying to double-glaze your existing windows (which in many cases will be impossible anyway). The gaps around an average sash window can be the equivalent of an aperture measuring ten or more square inches. Therefore it is important to reduce leakage as far as possible. Doing so will increase your comfort and reduce your heating bills. The cost of draught-proofing will generally be recouped within 5 to 25 years. It will take 60 to 100 years for new plastic double glazed windows to start saving you money, and added to this will be the cost of replacing the scaled units if they fail (remember that most guarantees are only for ten years). You might consider secondary glazing (an internal light metal sash window), which can be very effective. Never underestimate the usefulness of thick curtains in reducing draughts.
The less successful methods of draught-proofing include a flexible metal strip nailed to the runners, and surface mounted rubber seals. These tend to be either unsightly, ineffectual, or both. There are however a growing number of specialist joinery firms who will take your sashes out, carry out any necessary repairs, and insert much more effective and long-lasting brushes or other seals around all the edges of the sashes. There are clear advantages to going down this route:
 |
|
- Your repairs will be carried out professionally, which can include replacement of broken glass and missing putty.
- Air leakage will be reduced. This means less hot air going out and less cold coming in thus reducing uncomfortable draughts.
- Your windows will not rattle any more.
- There will be a noticeable reduction in noise from outside. Provided you are not in danger of destroying irreplaceable historic glass, you can have new thicker glass fitted at the same time, increasing the sound insulation of the window even further. (You will need to increase the size of the counterbalance weights accordingly).
- The seals are nearly or totally invisible, depending on the system employed.
- This method is approved by English Heritage and local authority conservation officers.
- By using this system you will not have desecrated your home with plastic windows.
- Finally and perhaps most importantly you will save money.
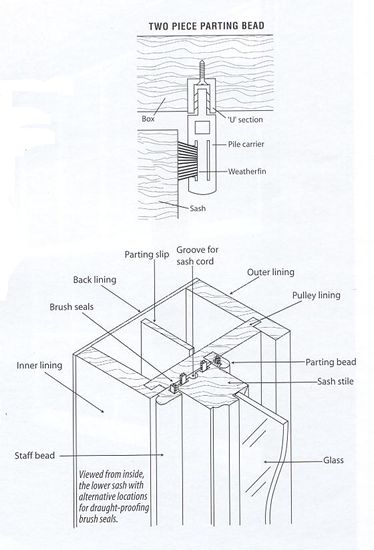
There are a few points of detail to consider (see illustration):
Seals While brush seals (fine, nylon fibres) are generally used, there are other
systems which employ seals made from urethane foam encapsulated in a polypropylene
sheath; all types are made in varying sizes to fit different gaps.
Location of seals If the parting bead is used to carry the vertical
seals, they will be visible and care must be taken not to paint over them,
otherwise they will become clogged and lose their effectiveness.
Parting bead with seal These come in two forms, plastic or timber,
the latter being the more expensive, especially if the original existing
bead is to be re-used in this way. The disadvantage of plastic is that
it usually comes in white only, and if painted, the paint will not stand
up well to friction from the sash moving against it, leading to white
streaks showing through, particularly if a dark colour has been used.
Gas fires and ventilation In order to function safely, gas-heating
appliances need a supply of air. Larger appliances could malfunction if
your draught-proofing is too effective – check with the manufacturer -requiring
the introduction of a new vent.
Building regulations and 'trickle vents' With the intention of reducing the probability of condensation and consequent mould growth, the Building Regulations require a habitable room to be provided with a trickle vent ('background ventilation' of 800mm square in area). Interestingly, this is equivalent to the average gap around the average sash window. Fortunately the same regulation allows you to achieve this by opening the top sash of your fully weather-stripped window!