


 57 / 208

T W E N T Y S E C O N D E D I T I O N
T H E B U I L D I N G C O N S E R VAT I O N D I R E C T O R Y 2 0 1 5
5 5
2
BUI LDING CONTRACTORS
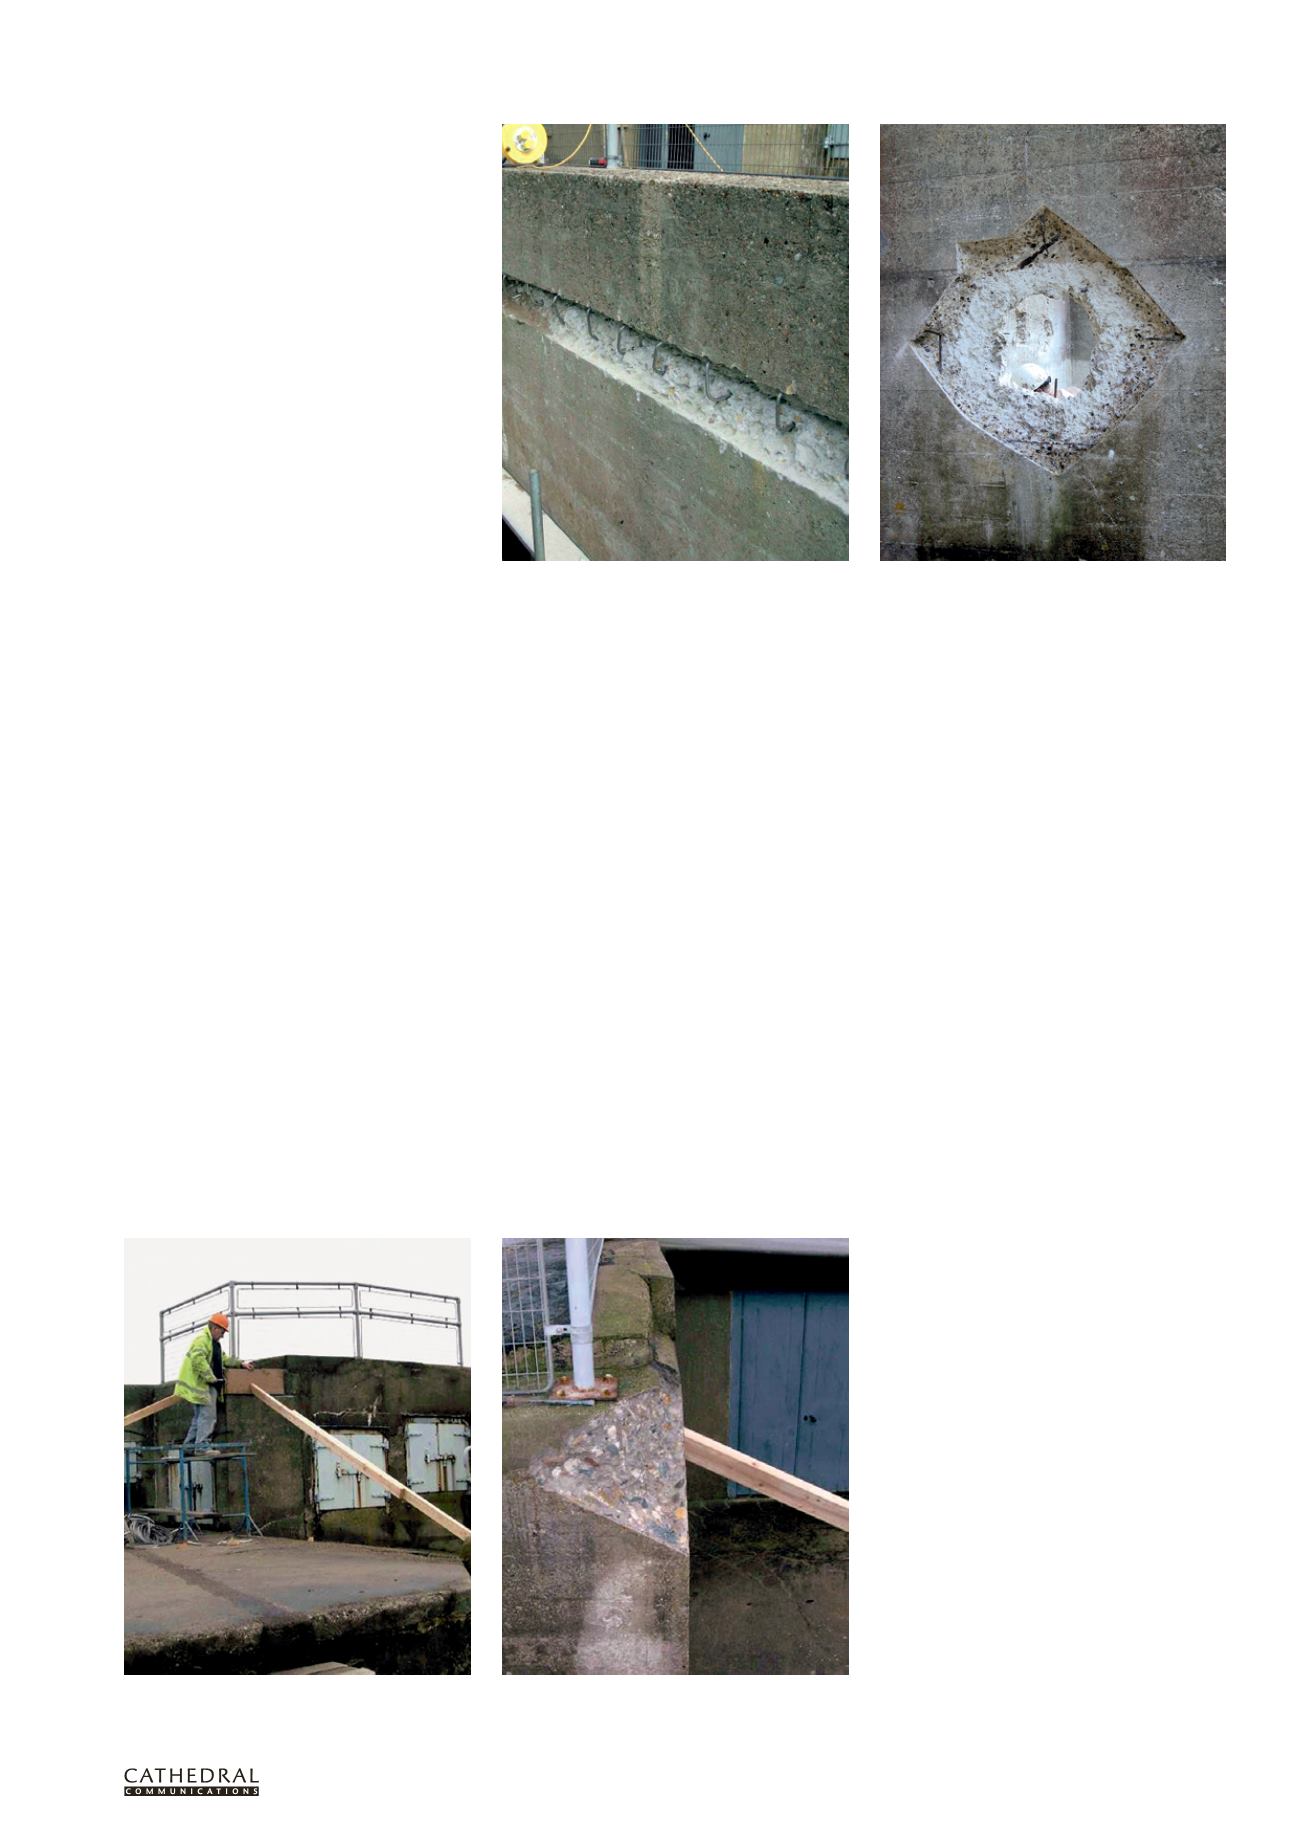
Figure 4 For bulk concrete or where different pours
of concrete have been applied, stainless steel cramps
may be inserted to bind the layers together.
be much finer than that used in 1976 and will
therefore have different setting properties.
Ordinary Portland cement (OPC) will also be
finer and will have different properties.
Sand
– Leighton Buzzard sand is still
available from the Leighton Buzzard Silica
Sand Company. It comes in 25kg bags in
different colours. The colours most likely to
match the original for the NT are the white
or yellow. The sand comes in various grades,
but the specification (0.25–0.71mm) seems the
closest match.
Large aggregate
– Fortunately,
Allen Newport Ltd is still operating in
Cambridgeshire; they do not now supply ready
mixed concrete but they still operate the same
quarry that supplied the aggregate in 1976.
This is now supplied as 10mm or 20mm – the
latter corresponding to what was probably
used for the NT in 1976.
The next stage was to prepare samples
of concrete (the ‘slab library’, see Figure 3)
using the previously identified constituents
in varying combinations and quantities.
Wooden mould boxes (approximately
300 x 300 x 50mm deep) were constructed to
cast them in. For fair-faced concrete, plywood
is normally suitable, but for replicating
board-marked concrete, rough sawn boards of
Douglas fir were used as specified in the bill of
quantities. This work is best carried out in the
workshop and the samples subsequently left
outside to cure.
Typically, 10–15 test flags should be cast
for a single type of concrete using different
combinations of cement (WPC and OPC),
different sands and different types and sizes
of aggregates to match those of the original
concrete, bearing in mind that for thinner
repairs, the size of the aggregates may need
to be reduced. Concrete analysis from the
NT showed that the aggregate size was up
to 20mm but it was considered prudent to
reduce this to 10mm for thinner repairs
(35–40mm deep).
Colour match is best achieved using
different combinations of sands, and
sometimes even cements. The original bill of
quantities stated 80 per cent WPC and 20 per
cent OPC. However, as even a small amount of
OPC combined with WPC can turn the repair
concrete grey, samples included some without
OPC. The slabs were left outside for a period of
weeks to determine their final colour. In some
circumstances colouring agents may be used
to help match the original ‘aged’ concrete, and
it is often worth evaluating these in some of
the samples.
Where a weathered surface is to be
matched, the surface of the concrete may
also be wire-brushed or abraded after it
has been struck from the boards, as this
removes cementitious material and exposes
the aggregate. Other finishes may also be
applied at this stage, for example where a
bush-hammered surface is to be replicated (a
textured finish made by blows from a studded
metal hammer). However, manipulating the
surface can be almost impossible if it has set
too hard, so it may be necessary to apply a
retarder to the surface of the boards when
casting the concrete. To assess whether
retarders are necessary, the bottom (board-
marked) shutter of each slab should be coated
and the top shutter left alone (with just a
release agent). The moulds should be broken
out early (typically 12 hours) and half of each
side (top and bottom) of the slab (retarded and
free) should be wire brushed (or mechanically
abraded) to assess the set. Setting is slower in
the colder months so retardants may not be
needed whereas in the summer months they
may be essential. Damp covers should be left
over the slabs after this work so that the slabs
can fully cure.
Trial mixes for the test slabs for the NT
are given in the table on page 54.
The cured test slabs can be used as a
visual reference library so that different types,
textures, colours and degrees of weathering
around the building can be suitably matched
as the work progresses. This is particularly
important where the concrete has variable
texture and colour or where it has been
subject to varying degrees of weathering. This
preliminary work will help the contractor to
establish optimum repair methods prior to
initiating the conservation work.
REPAIRING DAMAGED AREAS
Before any repairs are initiated, it is important
to determine whether the original structure
contains design faults that have resulted in
premature deterioration of the structure.
Faults might include concrete roofs with
inadequate waterproofing or rain run-off
features without a suitable drip. Alterations to
listed structures are usually permitted under
such circumstances.
Traditional concrete repair materials,
using similar constituents to the original,
should have a lifetime similar to that of the
structure to be repaired (many decades for
high quality concrete). However, traditional
concrete repair materials do not have the
enhanced adhesive and cohesive properties
provided by modern repair mortars with
polymer additives, so additional mechanical
means are required to improve the bond.
For repairs to reinforced concrete (RC), the
presence of steelwork within the concrete
breakout assists in the mechanical bonding.
For bulk concrete (BC), particularly where
different pours have not bonded, cramps
Figure 6 The best method of fixing the shutters is using external supports, although this is often impractical.
Figure 5 The back of the breakout should be left rough
to improve the bond of the new repairs. Additional
steel reinforcement might be needed in some patches.