
Repairing Lime Plaster Ceilings
Sean Wheatley
 |
||
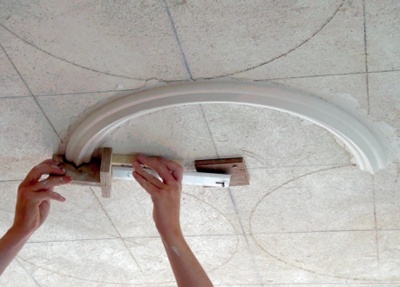
| Running a rib in situ (All photos: Sean Wheatley) |
The earliest plaster ceilings found in Britain date back to the Tudor period and are of lime plaster. At this time most ceilings simply consisted of the underside of the floor boards, and any decoration would have been confined to the carving of the timbers and elaborate paintwork. For royalty and the nobility, the installation of ornate patterned ceilings became a new means of expressing wealth and status, so these early examples tend to be covered in rich decoration.
It was not until the Georgian period that plaster ceilings became the norm, and plain plasterwork began to appear in even relatively modest rooms.
Lime plaster is essentially a wet mixture of slaked lime (calcium hydroxide) and fine aggregate. Once dry, the plaster begins to slowly harden through the chemical reaction between lime and carbon dioxide in the air known as ‘carbonation’. The result is a tight matrix of aggregate and calcite crystals (calcium carbonate).
As each coat could take several weeks to set adequately, plaster of Paris (gypsum) was sometimes added to the mix. This practice, known as ‘gauging’, was introduced into England in the reign of Henry VIII. It resulted in a much faster set because the gypsum sets by crystallisation on the addition of water. It enabled more effective use of moulds for fine decoration, resulting in crisper modelling. However, it was far more expensive than lime because the limestone from which slaked lime is made is widespread, while gypsum deposits are relatively rare. It was therefore reserved for the more prestigious work, and most early plasterwork encountered today is likely to be of lime plaster, unless associated with fine decoration.
COMMON CONSTRUCTION METHODS
The methods and materials used in the construction of flat plaster ceilings hardly changed from the Tudor period until after World War I. Wooden laths of riven (hand-split) hardwood – oak or chestnut – were used in the best quality work. Softwoods such as fir provided a cheaper alternative in later years, and sawn lath began to replace riven lath in the early 19th century.
Laths were nailed to the underside of the ceiling joists leaving a gap of about 10mm (3/8") between each lath, and the joints were typically staggered in bays of a little over one metre (3' 6") to prevent long cracks appearing as the plaster dried out. Long coarse water reeds (like those used by thatchers) were sometimes used instead of wooden lath, particularly in areas where the reeds could be grown locally. These were clamped to the underside of the joists to a depth of approximately 12mm (½") using laths.
 |
 |
|
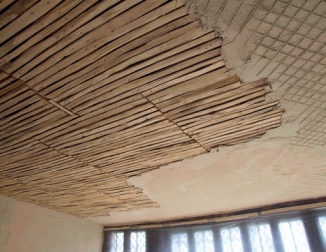
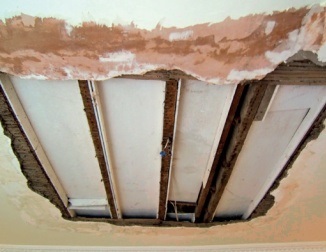
| New lath and plaster ceiling showing staggered lath joints and pricking-up coat | Lath and plaster ceiling which collapsed after fire-proofing was installed from above |
A ‘pricking-up’ coat of lime putty and sand or earth mortars was applied and pushed through the lath to form nibs or keys. This coat was typically 5-15mm (1/4"-5/8") thick. The nibs act as a mechanical key which helps the mortar to adhere to the lath. If reeds were in use then the first coat of mortar would have been applied directly to the reed but not necessarily pushed through the full thickness.
For restoration and repair work, lime putty should be a minimum of three months old. Historically many different types of sand would have been used – a blend of fine and sharp sand or whatever was available locally. Currently a good quality well-graded sharp washed pit sand is used for fine work. The standard mix is one part lime putty to 2.5 parts sand with the addition of cow, horse or goat hair (2-4kg (4½-9lbs) of hair per cubic metre of mortar). This is scratched after application using a three-pronged lath scratcher.
The plaster then starts to dry and initial carbonation begins. The timing of subsequent coats depends on temperature and humidity. Generally one month is an average drying time for the first coat. If the first coat has become very dry the surface should be dampened prior to the application of the second coat.
The second (‘floating’ or ‘straightening’) coat uses one part lime putty to three parts sand to a thickness of 10-15mm (3/8"-5/8"). Hair would also have been added but at a lesser quantity than for the first coat. The second coat is ruled flat and scoured using a wooden float to consolidate the surface. A devil float (a wooden float with nail points projecting about 2mm from each corner) is then passed over the surface to give a key for the finish coat. This surface also needs to be dampened to control suction before the application of the finish coat.
 |
|
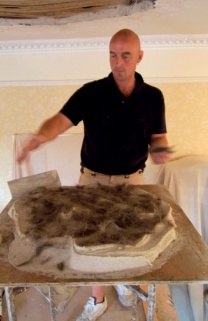
| Adding hair to lime mortar | |
 |
|
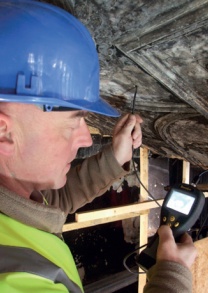
| Using a digital inspection camera |
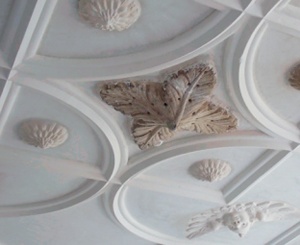
The decorative aspects of the ceiling were then applied. The design may have been a geometric pattern in which case the desired pattern would have been scratched on to the ceiling. In the earliest plaster ceilings the ribs or mouldings would have been run in situ using fine lime and sand. After the development of fibrous plasterwork in the late 18th century, the ribs or mouldings could be run on a bench and stuck in place. The decorative enrichments would have been cast using a carved wooden reverse mould or a wax mould. Later on, gelatine and rubber moulds were introduced.
The finishing coat was one part lime putty to one part fine sand or two parts lime putty to three parts fine sand to a thickness of 2-5mm (1/16"-3/16"), sometimes with the addition of fine short chopped goat hair.
Earth backing coats were used extensively in early plastered ceilings. Animal hair or chopped hay would be added to give tensile strength to the material when dry. Lime putty and fine sand were commonly used as the finishing coat.
TYPICAL DEFECTS
Probably the most common causes of collapse or damage to any ceiling, historical or otherwise, are:
- timber failure
- installation of new services
- installation of fire-proofing material
- fire damage
- water damage
- damp/wet rot
- dry rot
- insect infestation
Before any repairs can be undertaken the cause of the damage should be determined and rectified. Many ceilings that look irreparable can be saved.
If the cause of the cracking or collapse is not immediately apparent it could be that the timber supports are defective. If possible, ask someone to walk on the floor above to see if there is any flex in the ceiling timbers. It could be that the timbers used were not the right size for the job in hand. Also, if there is a crack in the ceiling look for evidence of dust continually appearing below it. This may also indicate joist movement.
In order to further assess the ceiling it is best to look at the back of the ceiling, either by carefully removing the floor boards in the room above or by accessing the loft space. A digital inspection camera is a very useful alternative, although this will mean drilling 8mm holes for the insertion of the camera lens.
At this point it will hopefully be possible to assess the cause of the damage and plan the appropriate repairs.
There are several different types of timber failure:
- principal joist decay caused by woodworm, wet or dry rot
- lath failure, commonly caused by insect infestation or wet/dry rot
- nail failure – wrought iron nails may rust and fail because the surrounding timber is damp or due to prolonged exposure to the tannins in green oak; the presence of rusting fixings may be indicated by stains on the underside of the ceiling
- fire damage will be self-evident but if there is no damage to structural timbers it may just be a case of a thorough clean up
- water damage from leaking pipes may cause wet rot and gradual bowing of the ceiling; the continued presence of moisture will cause salt and mineral migration which will eventually break down the integrity of the plaster and cause blowing (detachment of the plaster from the substrate)
- water damage from burst pipes is likely to cause the partial or total collapse of the ceiling as the increased weight of the saturated plaster is often too much for the ageing laths to bear.
REPAIR TECHNIQUES
If the ceiling is in a listed building then all work will require approval and or guidance from the local conservation officer. It will also be necessary to determine whether gypsum or lime plaster was used so that appropriate repair techniques can be selected. Knowing the age of the ceiling can be helpful here, but the form of any modelling provides another useful clue, since gypsum hardens quickly, enabling sharper details on sculptural decoration.
 |
 |
|
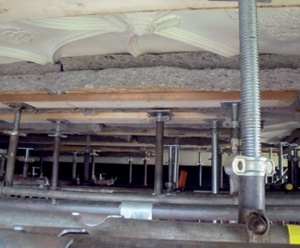
| Soft propping using sheep’s wool insulation, timber support and adjustable props | Back of ceiling showing missing laths due to woodworm | |
 |
 |
|
| Repair using a tray system | Re-fixing original enrichment |
The first priority in the case of a bowed or partially collapsed ceiling is to support it from below using soft matting to avoid damaging the face of the ceiling. The matting should be held in place with plywood and planks supported by adjustable props. Sheep’s wool insulation is ideal for soft propping as it will help to draw out moisture if the ceiling is water-saturated. Another good reason for using sheep’s wool is that it can be reused as insulation between joists after the repairs have been completed, provided that it has been reliably treated against clothes moth. Modern closed-cell insulation or packing foam can be used in some cases but should be avoided if the ceiling is damp because it will trap moisture against the surface of the ceiling.
Once the ceiling is safely supported, the repair work can begin.
Principal joist failure Structural repairs should be undertaken with the guidance of a structural engineer.
Secondary joist failure A new joist can be fixed either to the side of the existing joist or alongside, but not necessarily touching the original. All fixing should be carried out using screws rather than hammer and nails.
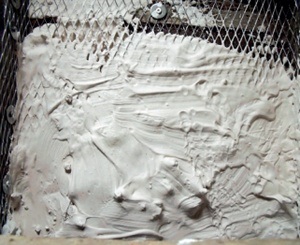
Lath/nail failure In the past the ‘tray’ system was commonly used to reconnect the lath with the joists. In this method stainless steel wire mesh was fixed to the inside of each joist across the back of, but not touching the ceiling. This formed a suspended bridge through which a casting plaster mix could be poured. The plaster acted as a stabiliser for the ceiling by using the mesh as a support, thus restoring strength and preventing further movement and cracking.
 |
||
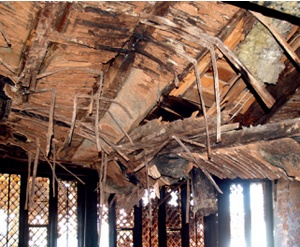
| Fire-damaged ceiling showing irreparable damage to supporting timbers | ||
 |
||
| The reinstatement of a ceiling following complete loss due to a fire |
An alternative method is ‘back plastering’. In this method the back of the ceiling should be carefully cleaned with a vacuum cleaner to remove dust and loose debris. Care must be taken not to damage the plaster nibs. The surface will need lightly dampening to control suction. Sheets of hessian or fibreglass mesh soaked in casting plaster are laid over the joist across the back of the ceiling and over the adjacent joist. This approach uses much less casting plaster than the tray system but, like the tray system, it is still considered an ‘old school’ repair because it adds significant weight and is irreversible.
The suspension system is preferred as it involves less alteration and is much lighter. This system uses stainless steel washers fixed to the bottom of a wire or threaded bar which is fixed through the plaster ceiling from below and suspended on metal straps attached to the joists above. The washer is countersunk into the underside of the plaster and the face of the ceiling is made good with appropriate materials. One drawback to this approach is that the repair will need decoration.
Fire damage If the ceiling is intact but blackened by smoke damage it may be possible to clean it using warm water, sponges and a suitable cleaning product.
If the fire has caused partial collapse but the overall strength/structure of the ceiling is retained then it would be possible to replace the damaged section alone. This would involve cutting back the plaster and laths around the damage to the joists to form a square opening, fixing new lath to the ceiling joists, and building up new plasterwork to match the original.
If the fire has caused major structural damage and all the supporting joists require replacement then the entire ceiling may have to be replaced. As much of the fabric of the ceiling as possible should be saved, including flat plaster and ornamentations. These pieces should be used to make moulds to cast replicas of the decorative elements of the ceiling.
Water damage The repair solutions for water damage are similar to those described above. However, a lime plaster is much more resilient to water damage than one based on gypsum, and once dry it may be found to have survived with relatively little damage.
In all cases it is worth investigating the availability of photographic evidence to assist in the repair of decorations. If no photographic evidence exists, another room on the same floor of the building may have similar designs from which moulds can be made, or there may be a neighbouring property with similar period details that are intact.
In all cases it is necessary to assess the materials that were used for the original ceiling and to source the closest match possible. A number of companies provide mortar analysis services and can provide a specification for the materials to be used for replacement.
Recommended Reading
English Heritage, Practical Building Conservation: Mortars, Renders & Plasters, Ashgate, Farnham, 2011
Historic Scotland, Conservation of Plasterwork, Technical Advice Note 2, Edinburgh, 2002
W Millar, Plastering Plain & Decorative, 1897, Donhead, Shaftesbury, 1998
JT Sawyer, Plastering, 1951, Donhead, Shaftesbury, 2007