
Traditional Brickwork
Geoff Maybank
 |
|
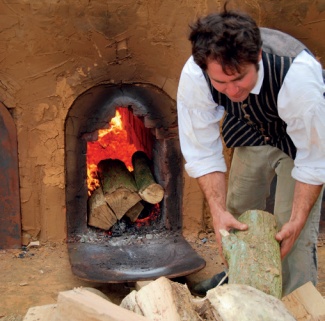
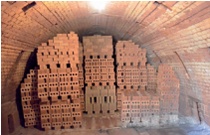
| A wood-fired clamp at HG Matthews |
Bricks are so common that we hardly spare them a glance, but in areas of the country with no suitable local building stone, brick has been the most important durable building material since Roman times. Brick is still favoured as the material of choice for many new-build projects, especially housing developments.
Despite being renowned for its durability, problems in brickwork can be very serious. They are often caused by subsidence, settlement or bowing, but more commonly are the result of poor or incorrect maintenance. Repointing with the wrong type of mortar, inappropriate cleaning by grit blasting or chemicals, or the application of water-repellent coatings, can all cause problems. Use cement renders externally, the wrong type of plaster internally or even the wrong paint system and you’ll have a vexing situation to deal with.
This article provides an introduction to the repair and maintenance of traditional and historic brickwork, focussing on solid brickwork constructed with soft, porous lime mortars, as found in pre-20th century buildings and structures. Although many of the issues are common to larger buildings and structures, the emphasis here is on houses.
HISTORIC DEVELOPMENT
Although brick construction in Britain dates from the Roman period, there is little evidence of significant use of the material after that until the late-13th century (Little Parnham Castle, Suffolk, for example). Technology probably developed under the influence of the Hanseatic League, trading from the Baltic through ports such as Hull, Kings Lynn and London, and decorative brickwork became briefly fashionable in the Tudor period.
Initially used for large, important structures, brick eventually took over from timber in many parts of England for the construction of ordinary vernacular buildings. However, the material did not become a substitute for stone until much later, when transport links by canal and rail had spread across the country.
Medieval brick sizes generally ranged from about 8½ x 4 x 2 inches to 10 x 5 x 2 inches, and dimensions of 9 x 4.5 x 2.5 were stipulated in a charter of 1571. The size was geared to a man’s hand, the length being twice the width, the width being twice the height.
 |
|
| Traditional clamp-fired bricks made by HG Matthews, their ends blackened by exposure to hot flue gasses in the wood fired clamp | |
 |
|
| 16th- and 17th-century infill panels in a timber framed out-building |
Clay was dug and allowed to weather over winter, or sometimes over several winters, until it had been broken down by frost action. This reduced the likelihood of the bricks warping when fired. They were handmade, flat on all sides and somewhat irregular in shape. The clay was hand-pressed into wooden moulds, allowed to air dry, then fired.
In the Tudor period purpose-built kilns were too small for the vast number of bricks required for the large, prestigious buildings then being constructed in brick. So, bricks were usually fired in simple wood-fired ‘clamps’, with the bricks stacked around fire tunnels and the whole structure daubed in clay or covered with turfs. Firing took several days and the clamps were then allowed to cool slowly.
Temperatures in the clamp varied, affecting the degree of vitrification – the fusion of silicate particles which occurs when making ceramics or glass. In ideal conditions the degree of vitrification would be sufficient to form a well-bound matrix. Over-firing could lead to excessive vitrification in the bricks closest to the heat, causing them to slump, while under-firing could result in some being too soft for external use.
The nature of local brickmaking in clamps made brick quality less reliable than that of later mass-produced bricks, and slight variations in size and shape required Tudor builders to use deep joints to accommodate the irregularities. In this way they were able to take the use of bricks to new heights with great palaces such as Hampton Court, Lambeth Palace and Oxburgh Hall. Brick became an exciting medium which allowed a new and dynamic evolution in design and embellishment.
Some of the finest historic brickwork is demonstrated in 15th-century chimney building, first in larger buildings but later in simpler vernacular buildings too. Timber and plaster fire hoods and smoke bays, which caught fire very easily, were replaced by purpose-built chimney breasts and stacks in brick or stone. Early examples were often added as external projections. In areas where good building stone was plentiful, brick was often preferred for chimneys for its ability to resist heat.
While stone was used throughout the country especially for large and high status buildings, domestic building in in much of southern England was still very much geared to timber framed buildings. However, after the Great Fire of London in 1666 a ban on timber buildings in the city promoted the use of more fire-resistant materials and bricks came into regular use. Aided by a growing shortage of timber for building, attitudes to brick began to change, first in the capital and then beyond.
Bell Hall at Naburn near York epitomises the growing trend for building in brick in England in the late-17th century. Built on a stone undercroft, this Grade I listed house is a striking gentleman’s residence which was built for the then MP of York, Sir John Hewley in 1680. He had no doubt seen good brick houses in London and went to Hull to find builders in brick for this house. By then the quality of production had improved substantially, resulting in more uniform dimensions and allowing thinner joints to be used. An indent or ‘frog’ was introduced, primarily to improve the moulding of the clay, but it also had a secondary effect of very much improving the grip of the mortar to the brick.
Regulations to control brick sizes were introduced during the 18th and 19th centuries, but the big changes came with an improvement in quality in late Georgian times, perhaps as a result of canal building and the need for stronger bricks for engineering work. In the industrial revolution that followed, the massive movement of people from country to towns and cities spurred vast building programmes. Without this step-change in brick manufacturing it is uncertain whether towns would have been able to expand so quickly.
By then clamp firing was less common, with the major brick manufacturers producing large numbers of bricks in down-draft kilns, with the bricks separated from the burning fuel by a low perimeter wall. This resulted in a product of more uniform quality and colour.
Production became more efficient following the introduction of continuous firing kilns in the mid-19th century, such as the Hoffman kiln, Firing occurred in successive chambers in rotation, with the heat from one firing being used to preheat the next one. The development coincided with the removal of a brick tax which had been introduced almost 100 years earlier to help pay for the wars in America, as well as rapid expansion in the railway network. The use of brick proliferated.
 |
 |
||
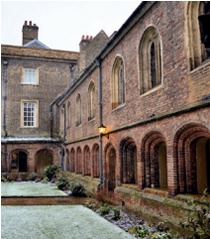
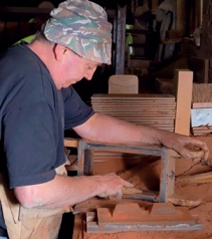
| Above left: Tudor brickwork in the cloisters at Queens’ College, Cambridge. Above right: Brick making at Coleford Brick and Tile: the mould for the frog can be seen fixed to the bench, and the wooden stock (here being cleaned) is then placed over it and filled with clay | |||
The colour of brick is primarily a product of the clay used and the amount of air allowed into the clamp or kiln during firing. A brick that appears red on the surface may have a core of yellow or deep grey where little oxidisation has occurred, and the colour varies across the face too, as a result of the movement of air in the kiln or clamp and the way the bricks were stacked.
Regional variations range from pale buff yellow in the South East, such as London’s stock bricks, to the bright reds found from the West Midlands to the great northern cities of Liverpool and Manchester, such as Accrington Nori bricks. ‘Staffordshire blue bricks’, on the other hand, are almost black due to a firing process which achieved high temperatures and oxygen deficiency, reducing the iron oxides that would otherwise have coloured the bricks. Performance and density varies too. Staffordshire blues, for example, are strong and densely made and were favoured for engineering works.
CONSTRUCTION
Before repairs are designed, it is essential to develop an understanding of the building’s construction or how the element that is failing or causing problems was made.
From the beginning of their use in late and post-medieval times, bricks were laid in lime mortar, which is relatively soft and highly porous. Originally it was probably made from lime putty mixed with coarse sand and other aggregates, but in many parts of the country the lime was impure enough to be more ‘hydraulic’ in nature.
Lime mortar remained in use until the beginning of the 20th century. Whether hydraulic or not, these traditional lime mortars allowed some movement in the brickwork without showing signs of cracking under normal seasonal conditions.
Solid brick walls in domestic two-storey buildings tend to be 9-13½ inches thick, which equates to a depth of 1-1½ brick lengths. In taller buildings base brickwork might be 18 inches thick or more, reducing in thickness as you rise up the building. In the absence of a cavity, solid walls simply rely on the mass of the wall to keep moisture out, a principle that works well as long as the wall is kept in good condition. Rain would soak part way into the structure but would then evaporate away again.
 |
|
| A chamber in a continuous firing kiln at Northcot Brick, now fired using gas and a small quantity of coal to replicate the effects of late 19th century technology. | |
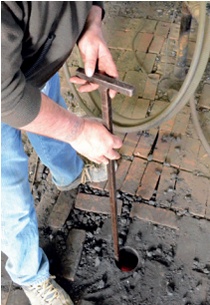 |
|
| Firing progress is checked by inserting a rod through a firing hole above the chamber to measure variations in the size of the stacked bricks. |
Walls constructed of porous brick and lime mortar and which are plastered with lime plasters are said to be ‘breathable’, as are brick or flag floors. In the winter months, the combination of large open fires and draughts from ill-fitting windows and doors kept a flow of warmed air running through a building and so enhanced the evaporation of moisture from walls and floors. The end result was a dry building with little sign of damp internally. It worked well, particularly when you consider that damp-proof courses in wall bases and under-floor membranes were only common from the mid-19th century.
The brick bond, seen in the wall as its horizontal pattern, can help in identifying the construction of the wall. In a solid brick wall of two leaves, header bricks are those laid at right angles to the face of the wall to bond inner and outer leaves, while stretchers are those laid parallel with the face. In English bond the courses alternate between headers and stretchers. In English garden wall bond, every fourth course or so is of headers, while in Flemish bond stretchers and headers alternate in the same course, and there are many variations on these themes. The type of bond used was often a trade-off between cost and strength.
The appearance of header bricks can help to distinguish solid brickwork from cavity walls, which first began to appear in the mid-19th century and became common in the early 20th. The outer leaf of the cavity wall is often a half-brick thick, so it cannot have headers. However, cavity walls of 15 or 15½ inches are quite common, and look for all the world as though they are solid. These can have a 9 inch outer skin and an inner skin of 4½ inches separated by a two-inch cavity. Some early examples of cavity construction in the mid- to late-19th century also used specially made bricks, not iron wall ties, to join the two leaves together, which appear as headers in the facade.
Just to make life even more difficult, Flemish bond brickwork is sometimes found where ‘snapped headers’ have been used. These are half-length bricks rather than full length, allowing a 4½ inch outer leaf to masquerade as a solid wall. Snapped headers were also sometimes used in solid walls, leaving the outer skin poorly tied into its inner leaf.
Buildings can also deliver unexpected problems. Larger buildings and terraces from the late-17th to the mid-18th century saw some poor building practices. Sometimes a high quality brick outer skin was built by a different team from the rest of the structure and was inadequately tied into a poorer quality inner skin. Despite the evident thickness of the wall and the appearance of well-bonded brickwork, the outer leaf is liable to move outwards away from the inner. Frequently, wall plates and so roof weights were supported off this poor quality inner leaf. Such problems can be expensive to put right.
The best bricks tended to be used for the front of a building but as you move towards the back, more often ‘commons’ or ‘stocks’ were used, which were cheaper but not as regular in shape. Internal bricks were usually of the poorest quality and often under-fired as they did not have to withstand the elements.
In the north of England there are tens of thousands of houses with 9-inch thick walls, usually at the rear, constructed with common brick in English garden wall bond. These walls were cheap to build, with header bricks every five to seven courses to hold the wall together, and the stretcher courses were not always fully mortared. They must therefore be kept well pointed to reduce the risk of water ingress.
In addition to solid wall construction, an early use of brick was for infilling timber frames. In houses, the frame and infill was usually plastered on the inside and sometimes rendered on the outside too, to draughtproof the construction. Thinner walls in old buildings, say 8 inches thick, that feel solid when tapped, might well indicate a brick infill to a timber frame. The thickness here is controlled by the size of the timber posts and beams used in construction, which remain structural in performance.
In view of the wide variety of brick construction methods, once the wall thickness has been measured and the brick bond inspected for clues to its construction, try to get a view into the core of the wall from around window reveals, or perhaps where a gas meter has been built into an outer wall. Only when you have fully understood what you are dealing with can you start to consider an appropriate repair.
 |
 |
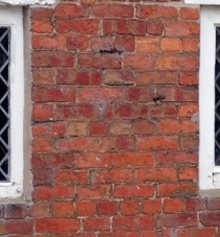
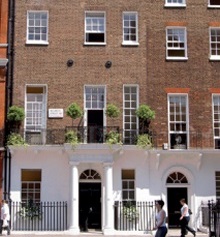 |
| Detail of late 18th-century English bond brickwork with five courses of stretchers between header courses | Detail of late 19th-century Flemish bond brickwork in St Michael’s Street, Shrewsbury, with light-coloured headers used to decorative effect | Late 18th-century terraced houses in Welbeck Street, London: stucco rendering with London stock brickwork above in Flemish bond. |
BRICKWORK PROBLEMS
Problems with brickwork can be categorised as:
- inherent defects such as inadequate firing, poor design or bad craftsmanship
- aging defects such as weathering and settlement
- maintenance defects such as open joints, plant growth in masonry and saturation from leaking gutters.
Water plays a significant part in many of the most common problems found in brick walls.
All brick is porous to some degree. Where brickwork is well pointed, most rainwater is shed from the relatively uniform surface, and any moisture absorbed by the brick or the mortar quickly evaporates. However, leaking gutters and downspouts can lead to saturation, causing major problems with any wall, brick or otherwise. Constant water running down walls will soak through most thicknesses of brick wall, eventually leading to the decay of any timbers it supports. Dry brick acts as insulation, but saturated brick conducts heat, so moisture inside the building condenses on the cold surface, adding to the problem.
Externally, saturated walls are also ideal locations for plant growth and the roots can cause lifting of bricks and more water ingress.
Over-flowing gutters can wash out mortar joints, also allowing more water ingress. In cavity walls with old wrought or cast iron cavity ties, the development of rust on the ironwork can lead to jacking up of bricks (see Structural repairs below).
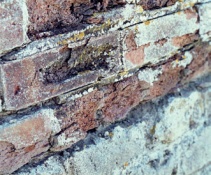
Freeze-thaw cycles in winter can also blow the face off any bricks which remain wet, as the ice expands within the pores. Furthermore, being wet for long periods can lead to salts being pulled to the surface of the wall where the water evaporates, leaving the powdery bloom of crystals called efflorescence Salt might be being drawn from the brick or the mortar or the source might be road salt splashing against the wall. In coastal areas sea spray can be another source.
Where crystallisation occurs within the pores just under the surface of the brick (‘cryptoflorescence’) you often see a thin skin of brick bubbling up, often without much obvious salt staining. This is due to rapid drying of less soluble salt crystals in the pores of the brick which cause the surface layer to deform. This superficial layer can be quite hard and brittle when dry.
 |
|
| Frost damage to saturated bricks: the cement pointing will not have helped. | |
 |
|
| Surface loss in well pointed and well maintained brickwork: in this case the problem may simply be that the brick was underfired and is susceptible to decay. |
Some salts are also hydroscopic, drawing water into their crystals and so allowing freeze thaw spalling of bricks to occur.
Salt migration can be very difficult to eradicate but encouraging better evaporation through the mortar joints and promoting drying out of bricks will help. Broken gutters and downspouts need to be fixed, and where road salt is an issue in winter months, any puddles which collect in the road should be drained away where possible.
Pointing
Keeping walls well pointed is important.
However, old lime pointing often looks
in worse condition than it is, and is often
replaced unnecessarily. If in some areas it has
weathered back by more than the height of the
bed joint, then it might be right to consider
local or complete repointing.
Samples of mortar should be taken from deep inside a wall to identify the original materials. As historic walls may have been repointed many times in their life, what is now seen on the face is not always correct. For preference, the mortar should be matched by using the same aggregates, which may include local sand, crushed brick and other material. If these are no longer available it is best to achieve a close match without using artificial pigments which can fade over time.
Old mortar should never be cut out using a rotary disc cutter as this can easily cut the bricks and so spoil them for all time, as well as widening the mortar joint. Chisels and bolsters should be used with care, and very tight joints might have to be cut out with a hacksaw blade. However, where brickwork has been pointed with a hard cement-rich mortar, the judicious use of a specialised mortar cutter (Arbortech or Fein for example) may be justified, provided the operator is highly skilled.
Portland cement-rich mortars should never be used to point historic brickwork as these are far too hard and impervious, forcing water to evaporate through the brick. Furthermore, pointing is always shallow; the rigid grip of the cement is confined to a depth of just half an inch of brick, so any movement in the wall can cause the face of the brick to fail.
Lime can be either lime putty or a hydraulic lime NHL 2 or 3.5, or in the most exposed locations, NHL 5. (The letters stand for ‘natural hydraulic lime’ and the figures relate to the material’s compressive strength in N/mm2 at 28 days.) With soft or damaged bricks NHL 2 might be considered appropriate, while NHL 3.5 or 5 should be used in areas that are very exposed and wet or with harder brick types. Hydraulic lime can be mixed with sand and other aggregates in the ratio of 1:2:5.
Hydraulic, in this context, refers to the reaction of the lime with water to achieve at least a partial set. This develops within hours and the mortar then continues to harden once it has dried out through carbonation, a reaction between the lime and carbon dioxide in the air. Lime putty, on the other hand, is non-hydraulic; it sets by carbonation alone. This is a much slower process, and a non-hydraulic lime mortar is vulnerable to wind and rain in its early stages, so it needs to be protected for longer.
Lime putty is even softer and more permeable than NHL lime mortar. This is regularly mixed with a pozzolanic material to give the mortar properties similar to those of a natural hydraulic lime, including initial setting properties and greater strength, as well as reduced permeability. The grain size and shape of the sand and other aggregates also controls the appearance and strength of mortars. This can be mixed in proportions of say 1:3:9 pozzolan : lime putty : coarse sand.
Structural repairs
The repair philosophy is to retain as much
historic material as possible. Once lost, original
material is gone for good, so cutting out old
perished single bricks and even turning bricks
and reusing them back-to-front can be a good
idea rather than renewing bricks. This is easier
to achieve with harder mass-produced bricks.
Structural problems are not uncommon. Apart from settlement or subsidence which might need more aggressive repairs, another common cause of brick failure is deeply embedded ironwork, rusting and jacking up bricks. Ferrous metals can expand by up to seven times their original width when they rust, exerting a force greater than the compressive strength of the brick, stone or terracotta that might surround them. Hidden structural iron or steelwork such as lintels and tie bars, as well more visible components such as metal window frames can all cause problems, often resulting in long vertical or horizontal cracks as they corrode. Where a wall contains rows of early ferrous cavity ties, brickwork between the rows sometimes bows with the jacking effect. Repairs will require opening up the structure to clean and protect the embedded metalwork from corrosion or remove it altogether.
The use of black ash mortar derived from colliery waste, particularly across the north of England, from the Victorian period through to the 1920s has contributed to ferrous metals corrosion.
The building of lengths of timber into brickwork, common in the 17th and 18th centuries in particular, can lead to movement as the timber rots out. In larger houses, interiors were often lined out in timber framing with lath and plaster finishes. This can make it difficult to find the timbers that were built in. Rotting lintels over window and door openings can also be a local problem.
 |
|
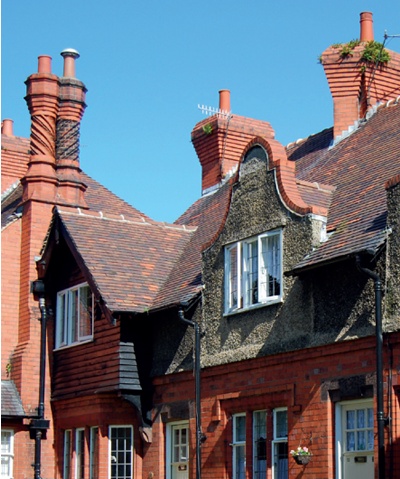
| Brick and pebbledash houses in Port Sunlight, Merseyside (1907) with splendid mock-Tudor chimneys: plant growth on one of them indicates water ingress as a result of poorly maintained flaunching |
Sulphate crystallisation can bring problems to chimney stacks and concrete ground floors. Introduced into flues from burning coal, the salts migrate into the brickwork and crystallise in the mortar, particularly on the side least exposed to the prevailing wind and rain. The lop-sided expansion causes the chimney to lean. When this becomes excessive, the stack will need to be rebuilt.
In wall bases, sulphate salts are sometimes drawn from colliery shale, a material that was often used after the war as hard-core beneath concrete floors in areas near coalfields. A floor re-laid in an old kitchen in the 1940s to the 1960s to replace flags or bricks, is often the site of this problem. Salt migration into the slab causes the concrete to radically expand, bowing concrete floors and even pushing the base of a wall outwards. The only remedy is to remove the concrete and hard-core and replace it. As concrete floors tend to trap damp, forcing it into the surrounding walls, removing the concrete is not such a bad thing. One option is to replace slabs with breathable limecrete floors that really work, helping to reduce damp in wall bases.
Paint and render
Cleaning may be necessary where brick is
heavily dirt encrusted, as it can obscure telltale
cracks and other evidence of underlying
problems. It may also be necessary to remove
an impermeable paint. However, all cleaning
methods entail some risk to brick and should
not be undertaken lightly. Nicola Ashurst’s
article ‘Cleaning Brickwork and Terracotta:
Getting it Right’ (The Building Conservation
Directory, 2011) explores the options.
Paint is a common problem; modern non-breathable paints prevent the external evaporation of water from walls, driving the problem inside. When new, many modern paints will trap moisture in the wall. As the paint ages and starts to crack and deteriorate, especially where it has been heavily overpainted, more water can get in but evaporation remains inhibited. Solid walls can become saturated causing serious internal damp and rot to any timber built into the wall. Removing the paint and repointing with a lime mortar will make a huge difference to this problem and should produce visible improvements. Often internal walls have been plastered with an impervious cement render to help to hide damp, whether rising or penetrating, so where damp ingress is a problem all cement surfaces should also be removed above ground level and lime plaster re-established. (Masonry at ground level and below may need to be water-proof to exclude ground water.) Where redecoration of areas affected by damp has to be carried out, then breathable paint, such as Kiem, Beeck and other mineral-based pigments can be used. They come in a large range of colours, are more durable than limewash, and have minimal effect on evaporation.
A similar problem can be caused by cement renders. When looking at a rendered wall it is always worth asking, why has this material been applied in the first place? Archaeological evidence would indicate that many historic buildings that are now bare were once rendered in lime, whether to help their performance or for decorative effect, often in imitation of ashlar. Infill panels on timber framed buildings should never have cement infill panels as this encourages the run off of moisture onto surrounding timber at a greater rate than a lime or clay surface will allow. In the south of England many timber framed buildings are rendered in lime or clay daub, and painted with limewash. This breathes well and so protects the underlying material, be it timber or brick.
However, in the Regency period Roman cement was used over brick in many towns and cities to create polite, classical facades in imitation of ashlar, and in seaside areas it was used to help keep salt spray out. These were then painted in oil paint. Although more flexible than later cement renders, cracking is inevitable, allowing damp ingress and preventing evaporation from taking place externally. If an impervious render is part of the historic character of the building, regular maintenance is essential to maintain a water-tight rain skin. In other cases, such as a render over a timber framed building, then a breathable solution is essential, such as a traditional lime render, finished with a breathable paint.
LEAP OF FAITH
It takes a huge leap of faith to move away from modern materials and back to old principles and materials, but in old buildings they really do work. Modern materials are easy to obtain and many builders have only ever used sand and cement for mortars and renders and know about modern paints and sealants. Old brick structures, however, only work properly when traditional materials are used. These materials might let some moisture in, but they also let it out again. The synergy between lime, brick and timber is impressive. Soft brick, hardwoods and soft mortars have lived comfortably together for hundreds of years – happily the proof is all around us.
~~~
Recommended Reading
RW Brunskill, Traditional Buildings of Britain: An Introduction to Vernacular Architecture, Gollancz, London, 1983
A Clifton-Taylor, The Pattern of English Buildings, Faber, London, 1987
English Heritage, Practical Building Conservation: Earth, Brick and Terracotta, Ashgate, Farnham, 2015 (forthcoming)
English Heritage, Practical Building Conservation: Mortars, Renders and Plasters, Ashgate, Farnham, 2011
M Jenkins, Repairing Brickwork, Historic Scotland Inform Guide, Edinburgh, 2007
G Lynch, Brickwork: History, Technology and Practice Volume 1, Donhead, London, 1994
P Smith, Rivington’s Building Construction Volume 1, Donhead, Shaftesbury, 2004
D Watt and P Swallow, Surveying Historic Buildings, Donhead, Shaftesbury, 1996