1 6 4
T H E B U I L D I N G C O N S E R VAT I O N D I R E C T O R Y 2 0 1 4
T W E N T Y F I R S T E D I T I O N
INTERIORS
5
lighter shade was to compensate for the
slight deepening of colour which would
be rendered by the finishing varnish.
Next came the application of graining
colour, or ‘rubbing in’. The graining colour
often included a mixture known as ‘megilp’,
which helped to prevent the paint flowing
together after manipulation, without
impairing its translucency. Megilp could be
made with many different recipes depending
on the experience and preferences of the
decorator and its manufacture was often
a closely guarded secret. However, one
standard recipe often described in early 18th-
century texts included sugar of lead (lead
acetate), rotten stone (a type of weathered
limestone which includes a high proportion
of crystalline silica), white beeswax,
turpentine and linseed oil.
The graining colour was applied
evenly and thinly in order to accentuate
its translucency, then the initial phase of
marking the grain began while it was still
wet. To create the effect of an open-grained
wood such as oak, combs were used to
produce the initial impressions of grain.
Sponges and flat brushes were generally
employed to create the effects of more close-
grained woods such as mahogany. After this
initial modelling the figures or ‘lights’ (see
illustration on page 162), which tend to run
at cross angles to the grain, were created by
wiping out the colour. This was normally
achieved with a rag folded two or three times
and placed over a thumb-nail or piece of
bone. In order to ensure that these lights did
not appear monotonous, it was recommended
that they were drawn in varied patterns as
seen in nature. The work was then left to dry.
Where knots were required, these could
be imitated immediately after the graining
colour had been applied by removing a large
round spot with a rag and by creating lights
above and below. A badger-hair brush was
then normally used to soften and blend the
edges of these lights. When the graining was
complete the knot could be painted in with a
sable pencil. It was considered more natural,
particularly on door panels, if knots were
placed to the side instead of in the centre of
the work.
The next step in the graining process
was overgraining. This term was normally
used to describe the application of colour,
in water or oil colours, to selected areas to
deepen and enhance the appearance of the
imitated wood through the use of shade.
Overgraining either warmed or cooled the
tone of the oil graining, according to the
requirements of the finished appearance.
This overgraining then required softening,
usually with a badger-hair brush, to give it a
natural appearance.
The grained work was normally finished
with varnish. In order to ensure an even
surface, varnish layers were rubbed down
between applications – with as many as eight
coats recommended in the manuals of the
day. It was then usual practice for the final
varnish layer to be polished.
DISTEMPER
In most instances the ground used in oil
and distemper graining was the same. In
the latter, it was suggested that, once the
ground was dry, it should be wiped with a
damp cloth as this would allow the distemper
colour to adhere better. Distemper graining
pigments were often ground very finely in
beer and thinned for use with weak beer and
water. The graining colour, sometimes with
the addition of megilp, was applied with a
large sponge or with a flat brush. Only small
areas could be worked on at any one time as
the distemper paint dried quickly. Rubber
or steel combs could be employed but tools
such as veining brushes and sponges were
also used according to the effect required.
Lights and knots could be further wiped out
with a rag. If the final appearance was not as
desired, the graining layer could be washed
off and the procedure started again.
If the overgraining was executed in
distemper it was often bound with strong
beer, vinegar or a combination of the two
and was not applied until the grained layer
beneath was dry. In general, water colours
adhere well to oil graining but a stronger mix
was required than if the preceding graining
layer had been executed in distemper. It
was also important that the distemper
overgraining was sufficiently strong for it to
remain fixed when varnished. As a distemper
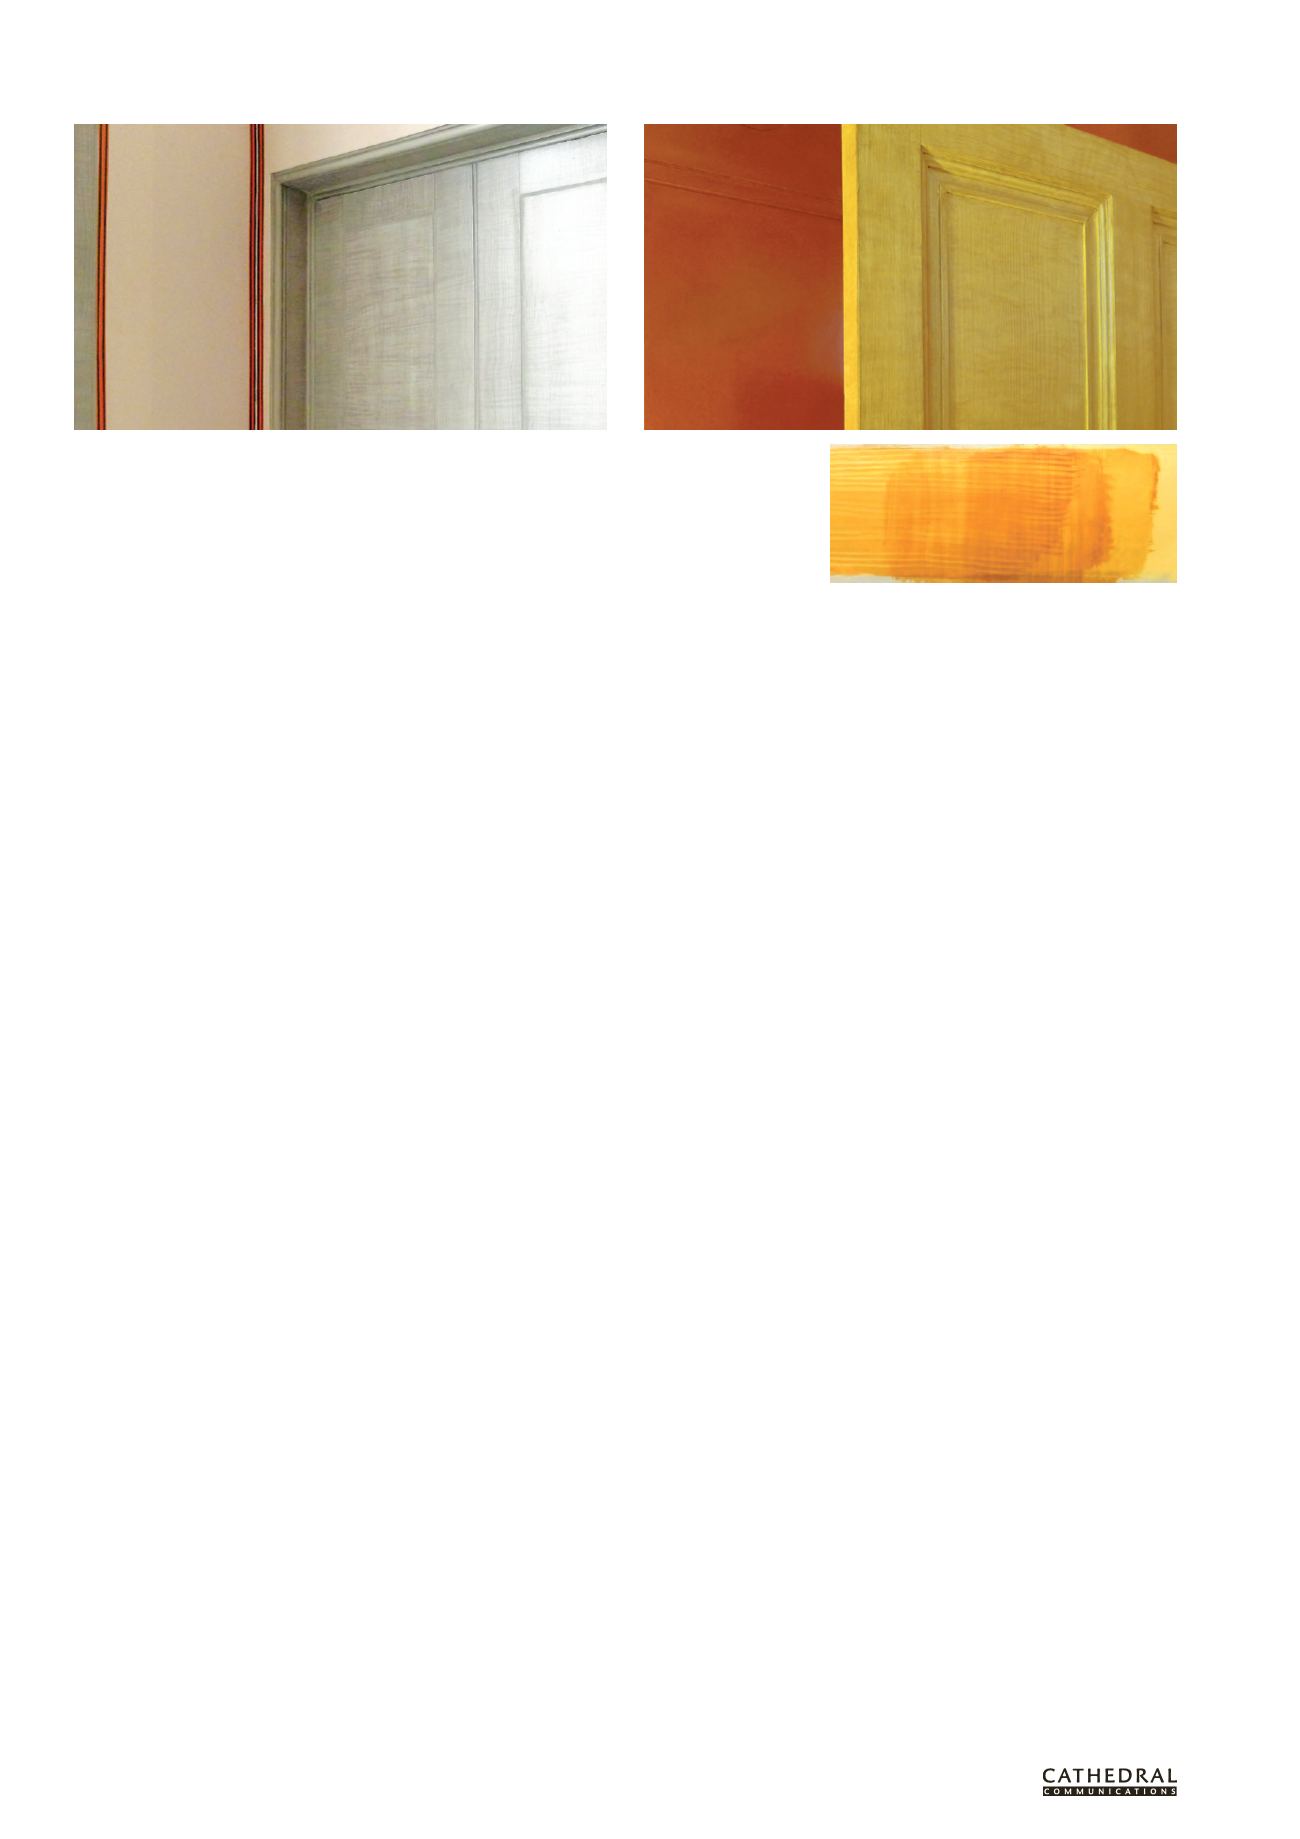
Recreation of imitation harewood (above left) and satinwood graining (above right) undertaken as part of the
conservation and restoration of Sir John Soane’s townhouse at No 12 Lincoln’s Inn Fields, London
Right: Sample showing the translucent layers of oil paints and glazes used to create the satinwood graining
effect above (All photos: Hare & Humphreys Ltd)
manuals in the 18th century of graining or
flat brushes being used for shading, there
is limited account of any other tools. In the
following century the documented range
of tools available for decorative graining
was quite extensive, culminating in a range
of patent mechanical aids. However, each
grainer would have had his favourite method
of working and would have chosen tools
according to his experience, the intended
medium and the wood to be imitated.
Therefore, although the potential choice was
large it was not considered necessary for the
grainer to have at any one time an extensive
collection of equipment.
The two forms of graining most
commonly executed by decorators in the 18th
and 19th centuries were oil and distemper
graining. In essence, oil graining is based
on oil paint (traditionally white lead and
pigment in linseed oil), while distemper
graining is water-based, typically containing
a soft distemper of chalk and pigment
bound in size (animal glue) and diluted with
beer. In practice, these two methods were
sometimes mixed and it was not unusual for
the final graining product to be the result of
a combination of these two techniques. The
more protective nature of an oil medium
meant that external work was invariably
executed in oil.
As described earlier, more primitive
methods of graining relying on the sole use
of opaque colours existed and were widely
used. However, the techniques outlined
below focus on the more advanced method
involving translucent glazes over opaque
grounds as gleaned from a reading of the
decorator’s manuals of the day, and in
practice a variety of techniques have been
found to have been used. The following
account is therefore most useful as a guide
to understanding the complex schemes
discovered by conservators.
OIL GRAINING
With oil graining the first task of the grainer
was to apply the ground on which the later
paint or translucent coloured glazes were to
be laid. The ground was opaque, preferably
with a matt finish and coloured so that
it was slightly lighter than the lightest
portion of the wood to be imitated. This


